skip to main |
skip to sidebar
Good morning and I hope everyone had a good weekend! We had a wonderful time at a bridal shower/PARTY - kind of a chilly evening but such good fun and great to get some serious visiting in.Don't forget that today is the last day that you can get in on the discount that Little Paper Shop is offering to celebrate our new look! Just add the words NEWLOOK at the checkout to receive 15% off your purchase!!Little Paper Shop has a sketch challenge today for our Monday fun and here is the funky sketch.....of course you are invited to play and this week's prize is {Katie Carousel}!! 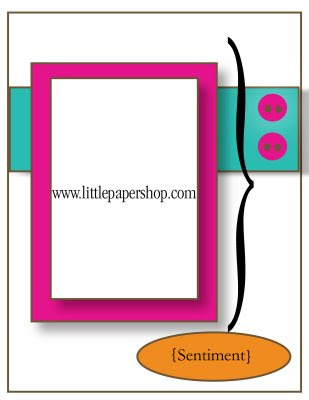 I played around with the sketch a bit and using one of our new digital images, I did my own variation - aren't you surprised?!! hee hee..... and this is what I came up with
.....
 Still the same but different right?!I used the {Rocking Horse} digital image and coloured it with copics. The tag sentiment is from our set {Little One} and I stamped it twice to represent the two little images in the sketch.Take a look at the other Little Paper Shop designers take on this sketch and leave them a sweet comment! They all work so hard and love to hear from you!Stamps: Digital image Little Paper Shop
Paper: Kraft, white, Basic Grey Marrakech
Ink: copics, Memento Rich Cocoa
Accessories: Spellbinders Kaleidoscope Pendant, PTI ribbon, Spellbinders Wizard tag trio, Basic Grey button, Basic Grey brad, Fiskars Threading water border punch 
ETA: I feel like a total fool and I apologize profusely!! We have a guest Sweetie this week, Anna Fiebelkorn, so please, take a minute and go and cruise her blog Scrap and Crap (isn't that a fun name??!!) and let her know what a doofus I am - c'mon I know you want to relay that message ....
Oh my goodness, my internet is the stupidest thing on this planet! I am not kidding one little iota......I called them and they told me someone would call me - that was two days ago and it is still being stupid so I am just uploading and doing what I can as FAST as I can!!
Soooo......enough griping.......today is Sunday and that means another fabulous Cupcake Inspiration Challenge from Hope Stamps Eternal!!Here is the wonderful yummy thing that we do. Rachel shows us a picture of a cupcake and we (the HSE Sweeties) get terrifically inspired by said cupcake, because we are just that way, and we make a creation that is based off the inspiration cupcake! Sound easy? Well, it IS!! and we would love to have you join us!  ETA: YOU DO NOT HAVE TO USE CUPCAKES IN YOUR CREATION! Anything is acceptable!Just create anything that inspires you after looking at the cupcake photo below, upload a picture of it to your favorite gallery such as Splitcoaststampers or Paper Craft Planet, use today's key word CIC22 (Cupcake Inspiration Challenge 22) and then come back to the Hope Stamps Eternal blog and leave your link with Mr. Linky!!Here is this yummo mummo cupcake photo!
and here is my card:
 Don't you just love it!!!??? I mean without getting toooooo gaga, isn't it just lovely??!! I just love the buttons and the sentiment (from Papertrey Ink) and everything about it! I think it is just yummy!
The Cuttlebug folder is an old one (as far as old folders go!) but Rachel has tons of the NEW CUTTLEBUG in the store as well as th enew 6 x 6 pads of Cosmo Cricket!
The edge punch is a Martha Stewart border punch and there are new ones available at the store too, along with the drippy gooey Hallowe'en punch!! I also saw that punch used with brown cardstock and a pig stamp - MUD!! How cool is that/?!
Thanks for coming around and don't forget to check out how the other HSE Sweeties interpreted this photo today!!Carolina - Carolina's Creative Pad
Rachel - Hope Stamps Eternal
Colleen - Glitter Ink
Michelle- Stop and Stamp the Roses
Tammy - Stamp Happy
Natalie - dougnat diaries
Jessica - Shamrocks and Seashells
Kelli - Yard Sale Kind of LuckStamps: (Around and About Sentiments)Papertrey Ink; Cardstock: (Dark Chocolate, Stampers Select White, Pure Poppy) Papertrey Ink; Ink: (Dark Chocolate) Papertrey Ink; Accessories: (Lattice punch) Martha Stewart, (Inverted Scalloped Circles Nestabilities, Plain Circle Nestabilties) Spellbinders, (Cuttlebug swirls embossing folder) Provocraft, (Pure Poppy ribbon)Papertrey Ink, Basic Grey Buttons, twine, pop dots,
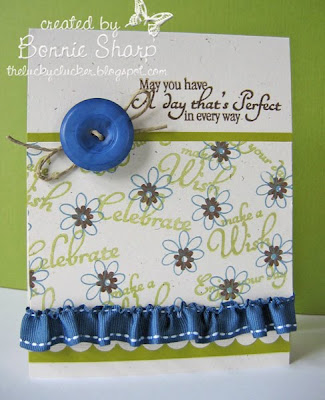
 Hello and happy Papertrey Ink August Blog Hop Day!! I'm still waiting for my PTI autumn stamps (boo! the postal system!) so I did my own thing this month.......This month's hop is all about Autumn and......well......I'll just let Nichole tell you herself.....;)"......create a project inspired by any aspect of fall. How about texture like fabrics, burlap, corduroy or stitching. Then there is color with hues found in autumn leaves, fall berries and other late season delectables. Patterns or motifs such as leaves, pumpkins, wheat and more."I tried to get out of my comfort zone and into my "courage" zone by making my own patterned paper, stamping/embossing a bit to create texture and using those gorgeous fall hues that I would not necessarily have put together!!
I also used Lisa Johnson's fabulous post regarding ruffling the saddle stitch ribbon- very cool! Stamps: Polka Dot Basics II, Trademarks, Everyday Classics, Background Basics Retro (on the leaves)
Cardstock: Summer Sunrise, Kraft, Scarlet Jewel, Spring Moss, Vintage Cream
Ink: Chai, Scarlet Jewel
Accessories: Stamping UP! Birds and Blooms Sizzlits Die, Cuttlebug Swiss Dot embossing folder, Threading Water border punch (Fiskars), Vintage cream button, twine,
It's time for another Hope Stamps Eternal Cupcake Inspiration Challenge! Of course you do NOT have to use cupcakes.....
the idea is just be inspired by the cupcakes photo!!
Everyone is invited to play along and if you do, be sure to link your creation to Mr. Linky on the HSE blog.
Every week, Rachel highlights the top 5!! Congrats to last week's Top Picks, who are posted on this post . If you upload to SCS or PCP, be sure to use keyword: CIC21.
Here is the wonderful inspiration photo of the cupcakes this week - isn't it yummy?!!

And here is how I was inspired....that hot air balloon pushed me over the edge and I knew I wanted to use this Basic Grey Lemonade paper (it's freakin' gorgeous!!) and with all the embellishments that go along - this card turned out wonderfully happy and fun!

I started by picking Mercy's fun sketch and made my card to suit both these challenges!
I used the hot air balloon image from Papertrey Ink's Everyday Button Bits and really, it is a cute set but I am such an anal (yes, anal) person, I had to go through all my buttons to find just the right size and colour and even now I am not sure about it.....but so it is anyway!
The beautiful pink rose and bling is by Zva Creative, and honestly, I use Zva all the time, and absolutely adore it!
I lift up the swirly bling with my craft knife and then lay it down gently and push all the little twinkly pretties down nice and firm. I also like to cut up my swirls, as I did for this card and then you really make use of it for a long time!!
I pulled some green leaves off of a Prima flower and then layered a white Prima Hydrangea flower on top and then my beautiful Zva rose on top of that!
Of course the scallops were made with my Stamping UP! scallop punch and then I added MORE Zva crystal twinklettes one by one onto the scallops. Using my Sakura Quickie glue pen I make a small dot on top of the scallop and then with my Quickutz picker upper thingy I adhere my little crystal pretties!!
Thanks for coming around and please do pop around to the other design team's blog to see how they were inspired by the gorgeous cupcake photo ;)! Carolina - Carolina's Creative Pad
Rachel - Hope Stamps Eternal
Colleen - Glitter Ink
Michelle- Stop and Stamp the Roses
Tammy - Stamp Happy
Natalie - dougnat diaries
Jessica - Shamrocks and Seashells
Kelli - Yard Sale Kind of Luck

That is what I am....ridiculous! I cannot catch up..... especially going into the weekend.
I want to get everything done so that I can enjoy some family time and yet I keep getting sidetracked by other important (Bejeweled) things that pop up and I need to do those things (Bejeweled) before anything else can get done!
It just seems that those other important things (Bejeweled) seem to take up soooo much of my time that everything else falls by the wayside.....(if you don't know what Bejeweled is, it is a good thing! - it's a computer game that is so dang addictive it has taken over my life... lol!)Well, I am sort of kidding, I do have many projects ongoing but I can show you a little something I made for a baby shower recently.I saw the idea on Jackie Pedro's blog (and a fabulous blog it is!!) and she had the link to Susan Liles blog (another ridiculously wonderful blog!) and that is where I found the tutorial - super duper easy - just a little time consuming but not too much that you don't want to make one! I only have this one picture because (as per usual) I was in a hurry to get somewhere and didn't take the time to take a proper picture!The letters are from Basic Grey unfinished cardstock alphabet and I painted them with baby blue acrylic paint and then sprinkled some glitter on them - which I HAD to do because, well, it's glitter!I cut out Stamping UP! designer paper using the oval and scalloped oval nestabilities and glued them together and then I adhered the letters to the ovals. I glued a popsicle stick onto the ovals and shoved (another technical term....) them down into the diapers so they would stay put.I cut the stars out of the same designer paper with the small and large Stamping UP! star punch and glued them together and then added them around the bands on the cake! It was a hit and apparently it has a place of honour on the dresser of said baby Liam.......I should tell them to open up that cake because he will soon be too big to wear the diapers!!
*** Thank you in advance for scrolling down for our Hope Stamps Eternal Cupcake Challenge!! It's yummy!***Good morning and welcome to our first previews this month for Little Paper Shop!
Of course you know we have a whole new look, a fresh change and cutie pie images coming your way!Every month we have a Senior Design Team challenge and this month it was my turn to choose the challenge! I have never done the Spotlighting technique and wanted to try it so I used the tutorial from Splitcoaststampers.
Check out this tutorial and it will tell you everything you need to know about Spotlighting!!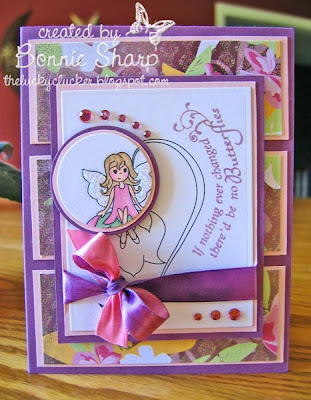 I used some of my Memory Box paper for my card along with Papertrey Ink cardstock .
You will see that the ribbon is kind of variegated......well I used my copics to colour the ribbon and used different shades of pink and purple to create a multicoloured look, which was also this weeks Ways to Use it Challenge on Splitcoaststampers!The sentiment is from Little Paper Shop's {Butterflies} set and since these stamps are photopolymer stamps they are bendable and so that is just what I did with the sentiment!! I bent it so it fit around the flower - how cool is that!!
Well, now I have some fun news! If you would like to win some digital images, pop on over to the Little Paper Shop Blog and leave a comment, any ol' comment, and you may be one of THREE winners this week to receive TWO free DIGI images!! FUN, FUN, FUN!!!
And don't forget that in celebration of our new look, there is 15% off everything in the store!! But you need to add the code NEWLOOK to be able to receive the discount!!

Good Sunday morning and welcome to another Hope Stamps Eternal Cupcake Inspiration Challenge. Of course you do NOT have to use cupcakes.....
the idea is just be inspired by the cupcakes!!And we have a special guest designer this week too that you will NOT want to miss! I will tell you more at the end of this post!Today's cupcake is so full of purples that you will love it! I am not a purple person, at least I didn't think I was and then when I saw the cupcake to be inspired by, my mind was racing with so many possibilities!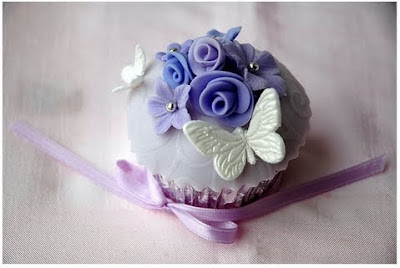 I knew right away I wanted to use my new Marks Paper Co. English Garden Collection - just filled to the brim with beautiful floral images and butterflies!This particular collection has some die cuts that are included in the package and one of those diecuts just happened to be a big ol' purple butterfly, which fit perfectly into the image on the designer paper! Isn't that cool?!
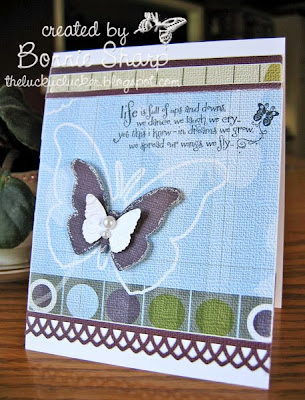 I had just received a new stamp set from Hope Stamps Eternal by The Greeting Farm called Butterfly Wishes that I was so looking forward to because my friend Jessica Diedrich had a hand in designing it! and of course I had to use it on this gorgeous paper!I used two of Martha Stewart's punches on my card, the lattice border punch and the butterfly punch which I see are both sold out at Rachel's, but she has a ton of other Martha Stewart punches that you will probably not be able to if you resist!!
If you click on the card to enlarge it, you will see that I dry embossed the small white butterfly with a Cuttlebug Butterfly folder - very appropriate ;)...I outlined the big butterfly with my pretty Stickles, added the white butterfly and then topped them off with some beautiful Zva Pearls.Finally, I stamped the sweet sentiment off to the side of the butterfly in Tuxedo Black Memento ink.I hope you can join us for this inspirational challenge- we would LOVE to have you try it out! Just link up your creation onto the Hope Stamps Eternal Blog so we can all come around and take a peek!Thanks for coming around and please do pop around to the other design team's blog to see how they were inspired by the colour purple ;)!
Oh I almost forgot to tell you about our guest designer!
Her name is Maureen Wong, from My C.A.S.E. Studies, and her blog is full, and I mean FULL of gorgeous creations, so don't forget to take a lookie over there too!Carolina - Carolina's Creative Pad
Rachel - Hope Stamps Eternal
Colleen - Glitter Ink
Michelle- Stop and Stamp the Roses
Tammy - Stamp Happy
Natalie - dougnat diaries
Jessica - Shamrocks and Seashells
Kelli - Yard Sale Kind of Luck
Before I start my post I just want to tell you that Hope Stamps Eternal has the new 6 x 6 pads of Cosmo Cricket in........just so you know.......you better run......It is the 15th
of the month and that means that 2 new Dirty Girls are being revealed over at Splitcoaststampers!! They are both awesome choices and if you would like to know ...........I can't tell you...... sorry!!But if you join the Fan Club you would be able to find out!! What are you waiting for? It is a host of inspiration and fun challenges that you get to take part in - LOTS of fun!!I can finally start to show you some of my projects from the Dirty gallery! I remember making these projects and my stomach in double sailor knots just thinking that they weren't "dirty" enough!Our April gallery was called "Going Green" and you could take it either ecologically or figuratively. For this project I decided to go figuratively and make a frame with my grandson Jake front and center, playing with his John Deere tractors in the window of his home. I left you a link in case you have (unbelieveably) never heard of John Deere. My two year old grandson is obsessed with anything John Deere so the day he had on his John Deere sweater and his John Deere hat, AND he was playing with his John Deere tractors in the window, his mother had to grab a photo! I sanded and painted the frame with Light Antique White acrylic paint, resanded and painted again. Then I just added my three colours of paint onto the frame in blobs (technical term) cream, tan, and burnt umber.....and swiped away with a sponge brush. I didn't blend the colours together too much, since I wanted it to look like dirt. While it was still damp I sprinkled some Rangers distress embossing powder over top and heat set it with my heat gun. For the clouds I hand drew a cloud from cardboard and used both the cloud and the negative space from the cut out cloud to create my sky. I just sponged two different ink colours around my cloud templates and voila!! instant sky!! To create the tree "leaves" I dampened the cardstock circles cut with Nestabilities, to soften it and then crumpled it up into a ball. When I opened it I brushed my Brilliance inkpad over the top and it only hit the folds, creating the darker colour. Then I sprinkled clear embossing powder over top and heat set it.
I sprayed my Tattered Angels glimmer mist over top of that and then, because I am impatient, I heat set it again.
The cardstock was still somewhat folded so I ironed it out to flatten it - but not too much because the embossing powder will melt!!
I added some yellow Stickles Glitter Glue to the dark ink and then attached it to the dark green circle which was embossed with the Cuttlebug Leafy Branch folder. The Maya Road tree trunk was painted in the same fashion as the frame, just blobbing on paint and NOT blending it together, to create bark. I adhered the whole tree to the frame with Tombow monoglue. I assembled the Quickutz Tractor (John Deere of course!) and added the twine so that it looks like it is pulling the sign. "There is only one perfect grandchild, and every grandparent has it."Stamps: Little Paper Shop Paper: Papertrey Ink Cardstock Ink: Stamping Up Ballet Blue, Adirondack Lights Aqua, Brilliance Pearlescence Thyme, Memento Tuxedo Black Accessories: Ranger Distress powder, Nestibilities Scallop and Plain Circles, Spellbinders Tags 5, Tattered Angels Glimmer Mist, Decor Art crafters acrylic paint, Quickutz tractor die, Maya Road fresh chipboard cherry blossoms & birds, May Arts Ribbon, wooden frame 
Oh my word what a hot day it is today,  but the sun is shining and I think my clothes will dry very fast today!! YAY! I love hanging out clothes!!
Talk about hot, the colour challenge on Dawn McVey's blog is a hot one! I actually kind of cringed a bit, and I don't think I would ever have put those colours together but really, when I finished with my card, I was quite pleased with it! Who knew??!Here are the colours I used Raspberry Fizz, Vintage Cream, Plum Pudding and Scarlet Jewel, all from Papertrey Ink and here is the beautiful swatch the Dawn made up!
 I started by getting my sketch and I decided to use the 2 Sketches 4 You sketch this week.......totally cute and I switched it around a bit, because after all, that is a woman' s perogative to do things like that....and you know I would......
 I always start a colour challenge by pulling all of the colours from my cardstock pile. This is all very scientific, you understand, and not to be shared with just anyone!
  Since the piece I pulled of Scarlet Jewel was smaller, I decided to use that for my base, so this is a 4 1/2" x 3 1/2" card. I ran it through the Swiss Dot embossing folder and then edged the piece in Vintage Cream ink - LOVE doing that!I stamped Background Basics Text Style and the Fancy Flourishes in Plum Pudding onto the Vintage Cream cardstock and then stamped the sentiment from Damask Designs in Scarlet Jewel Ink.I made a little scalloped border piece from In Bloom designer paper and also used it for my scrunchy flower along with Plum Pudding from Bitty Box Basics.The button is a Vintage Scarlet Jewel button and I tied it with a bit of twineThe front panel is popped up a bit because that is part of the scientific process - really it is!!I took my photo outside in front of my beautiful impatience plants! Love that Raspberry Fizz- it's everywhere!
ETA: There is a NEW LOOK at Little Paper Shop! Take a peek on over at the new site and get 15% off of your order!! but only until August 31st! Just use the code NEWLOOK (all caps) to get your discount!!
Yay!! It's Little Paper Shop Monday and this week we were able to pick our favorite colour combo!
Well, I LOVE turquoise with anything......soooooo, I matched it up with pink and kraft....nothing wrong with that is there?I used a new digital image that we have at Little Paper Shop (along with a WHOLE NEW LOOK!!) and the sentiment from the stamp set {Jungle Fun}
If you would like to play in our challenge to use your favorite colour scheme, upload your card to Splitcoaststampers or Papercraft Planet with the keyword, LPSC28 and then leave your link on the Little Paper Shop blog.
You could win two free digi images!!
Take a peek at the other design team members blogs and see what their favorite color combo is!!
I particularly feel like it is a zoo around here lately.........we have chipmunks all over the place and our miniature Schnauzer, Rosie, thinks she has to eradicate them all, even if it means digging up holes all over the place!  And our other sweet dog, Queenie, is getting so old she is shedding her hair constantly, I swear I could sweep up another dog!Holly's cat has been sick for two days and I mean messy sick, ewwww,
  and it even doesn't seem to matter that she lives across the road, it's just bad...... yeh sorry
...
Stamps: {Jungle Fun}, digi image (Little Paper Shop)
Paper: Kraft, White, Aquamist, (Papertrey Ink); October Afternoon
Ink: Black, Rich Cocoa (Memento); Baja Breeze ( Stamping Up); Hibiscus Burst, Chai, Camomile (Papertrey Ink)
Accessories: Swiss Cheeze Punch (Ek Success); Buttons (Papertrey Ink): gem (Hero Arts)


