Pages

Showing posts with label Case This Sketch. Show all posts

15 Aug 2016

Let's Chat over Coffee!

Wow - the Colour Throwdown is at #405 - crazy!!....and CAS(E) this Sketch works well for my Floral Shadow card!

Here are the colours for Color Throwdown- I'm cutting it soon close (as usual) so this is a short post!


I just received my new Altenew sets, Coffee Love, and Floral Shadow, so of course I had to ink them up!

Altenew Floral Shadow is so pretty and when used as a border, it looks so beautiful!

I stamped along the edge of my cardstock panel with dye inks and then, using a wet paintbrush I moved the ink around for a watercolour effect.  Stamping along the edge works well for the CAS(E) this Sketch challenge this week!
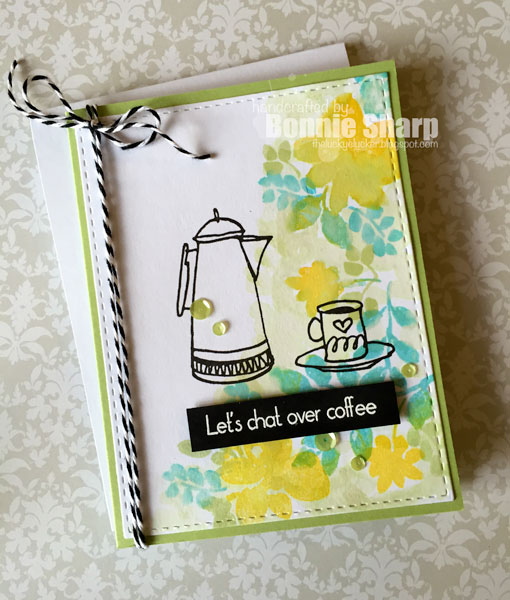


I stamped the coffee pot and mug with in Versafine Onyx Black.

I white embossed the sentiment onto a strip of black cardstock and popped it up onto the watercolour panel.

I adhered it to my Spring Moss card base, added some twine and a few (very few!) Pretty Pink Posh sequins.

Here is the sketch for CAS(E) this Sketch!


23 May 2016

Merry & Bright CAS

Good Morning! We are still celebrating the long weekend with another holiday - any excuse!

We had our annual Fishing Derby yesterday and although the sun was shining, it was still chilly and cold - I think if I make some Christmas cards Mother Nature might get mixed up again and warm up - here's hoping!

The CAS This Sketch challenge was kind of funky - and since I am not a funky gal, I brought out some trees to showcase the triangles in this sketch.


Using CAS-ual Fridays Snowflake Splendor, I stamped the tree images with Versamark ink and embossed them using gold embossing powder.


I also embossed the sentiment - from Snowflake Splendor - in gold embossing powder and then die cut my panel from Your Next Stamp's Stitched Rectangle Die Set.

Since the trees are such an easy triangle shape, I fussy cut and popped them up onto my card panel with the sentiment. I had already adhered a splingle of gold thread  and it looks so pretty - all that gold!!


I adhered the panel onto my card base without popping it up - trying to keep it CAS and all.....(although I really wanted to add sequins and shimmer mist etc etc etc..... I survived)

Thanks for joining me this morning - hope it warms up just for me!!

8 Apr 2016

You're My Person

You're My Person……how many times have you heard that saying? - I absolutely love it - but then anything Grey's Anatomy is GREAT in my book!


This week's CAS(E) this Sketch lends itself to these cute little love arrows from CAS-ual Friday's Cupid's Arrows Stamps and Heart Board Fri-Dies!


I die cut the Fri-Die arrows and then stamped each one with a different sentiment from Cupid's Arrows.

I used my Hero Arts Ombre ink pad for each sentiment - since the ink pad has three separate colours, I was able to stamp each sentiment in a new colour - still creating a cool ombre effect! - I'm just so smart Lol!!


….and….because I can NOT make a proper Clean and Simple card to save my life (dang!)- I needed to add the extra embellishments.  The cute little heart is also a part of the Heart Board Fri-Dies…..it makes a ton of open hearts - very fun!

As always, if you want to purchase these CAS-ual Friday products - and why wouldn't you?- use the special code on my sidebar for a 15% discount - What's that you say??! - YES - a 15% discount - just use the code Bonnie2016 - woop! woop!


6 Mar 2016

be kind

Hello!

I recently received the lovely set Concord & 9th's Sophisticated Script - honestly -it is crazily the prettiest font set ever!

I used this week's Case This Sketch for my sketch - easy and quick.


I stamped the letters to say "be kind" - always a great thought - onto my white cardstock panel and then die cut it with one of the Reverse Confetti's Edgers Confetti Cuts.

I adhered that to a piece of Papertrey Ink's Black & White All Over Patterned Paper.

Using Reverse Confetti's Garden Bunch stamps and Confetti Cuts, I stamped the flowers with Hibiscus Burst and Raspberry Fizz and adhered them to the panel.

I adhered my finished panel to my Hibiscus Burst card base and I was done.  I didn't add sequins or baubles because I just love it as it is!


Have fun with this sketch - only a couple of days to go!


1 Feb 2016

Thanks from all of us!

I really liked this week's sketch at CAS(E) This Sketch and so I played along….

I began by simply "smooshing" a watercolour background onto Ranger watercolor cardstock using pinks and yellow re-inkers and setting it aside to dry.  I decided to buy the 8 1/2 X 11 cardstock and cut it into quarters - it saves a bit of money and that's a good thing….


I die cut the Simon Says Stamp "thanks" sentiment from Papertrey Ink Raspberry Fizz cardstock and then actually HANDCUT a piece of white cardstock with my paper trimmer and stamped the sentiment (from Mama Elephant Photobomb).

So weird…..I looked for a die that would cut a piece of white cardstock and nearly panicked when I couldn't find the size of die that I wanted…..soooo dependent on those dang dies….. haha!


Using my "smooshed" background, I die cut the Single Roses Wafer Die - I had not even separated the dies yet, but I thought it looked great.  I only used the positive part of the die cut - (at least I think - I was never too good with my positives and negatives) I will save the positive (?) die cuts for another project.

I die cut my background cardstock with Your Next Stamp Stitched Rectangle Dies and adhered it to a white card panel.

I adhered my two sentiments together,  popped it up onto the background and adhered it to a Raspberry Fizz cardstock base.


Okay that is all for today - Thanks for coming around!