This week at Crazy 4 Challenges, we are celebrating DESSERTS!! Yummy! We Canadians have had our fill of food after celebrating our Thanksgiving, but really can you ever have enough sweets?! ...and its National Dessert Day!!!
I used one of Suzy Plantamura's Birthday Notes watercolour sheets from Simon Says Stamp for my dessert! I watercoloured the image using Zig Real Brush watercolour markers - one of my favourite ways to watercolour.
After die-cutting my main image using Mama Elephant All Prettied Up, I adhered it to my background patterned paper from Lawn Farm Perfectly Plaid 6 x 6 paper pad.
A perfect Dessert for National Dessert Day!!
Link up to Crazy 4 Challenges won't you!
Showing posts with label watercoloring. Show all posts
14 Oct 2017
19 Apr 2017
Congratulations!
Good day - I am finally posting our Crazy 4 Challenges post - Blogger seems to be having a childish fit and my posts won't save, but I am going to go ahead and see if it will publish ----ugh, technology!
This week at Crazy 4 Challenges, we have a sketch challenge and I loved putting this one together!
I die cut three rectangles with a small die, and using the Verity Rose stamp set from Crafter's Companion, I stamped the beautiful rose three times onto the Crafter's Companion white watercolour paper.
I watercolored each rose and then added sparkly glitter to each rose. The sentiment is also from Crafter's Companion as is the Verity Rose patterned paper - love this paper!
Take a boo over to Crazy 4 Challenges and try out the sketch - it's fabulous!!
This week at Crazy 4 Challenges, we have a sketch challenge and I loved putting this one together!
I die cut three rectangles with a small die, and using the Verity Rose stamp set from Crafter's Companion, I stamped the beautiful rose three times onto the Crafter's Companion white watercolour paper.
I watercolored each rose and then added sparkly glitter to each rose. The sentiment is also from Crafter's Companion as is the Verity Rose patterned paper - love this paper!
Take a boo over to Crazy 4 Challenges and try out the sketch - it's fabulous!!
15 Apr 2017
Easter Egg Decorating Fun!
Good Morning.... I have a fun little video for you today to show you a new way to decorate your Easter eggs!
My first video - be kind lol!
I'm using my fabulous Spectrum Noir Aqua Markers, paper towels, clothes pins and a water mist bottle. It takes no time at all - except drying time of course.
My first video - be kind lol!
14 Feb 2017
I Could Just Spit!
I laughed out loud when I saw this stamp set, Llama Love, by My Favorite Things. This sentiment is my favourite and quite appropriate this week for me.
This technique that Tracey is using on her Muse Challenge card is always so fun so I wanted to try it again with Llama Love.
Here is Tracey's card that we are to use as inspiration......cute as a button!
Here is my take on the challenge.
I pretty much stamped every image in the stamp set with Versafine Onyx Black ink onto watercolour paper and then worked away at it with my Zig Real Brush markers. I LOVE the pink Llama's - perfect for Valentine's day!
I heat embossed the sentiment onto black card stock and laughed the whole time I was running my heat gun.....I'm not sure why I think it is so funny - it just IS!
There is a lot of time left for the Muse Challenge - give it a go won't you?
This technique that Tracey is using on her Muse Challenge card is always so fun so I wanted to try it again with Llama Love.
Here is Tracey's card that we are to use as inspiration......cute as a button!
Here is my take on the challenge.
I pretty much stamped every image in the stamp set with Versafine Onyx Black ink onto watercolour paper and then worked away at it with my Zig Real Brush markers. I LOVE the pink Llama's - perfect for Valentine's day!
I heat embossed the sentiment onto black card stock and laughed the whole time I was running my heat gun.....I'm not sure why I think it is so funny - it just IS!
There is a lot of time left for the Muse Challenge - give it a go won't you?
29 Nov 2016
Being Kind is Never Wasted
I was able to get my hot little hands on some of the new Concord & 9th stamps - specifically the new Kindhearted Bundle which includes the Kind die and Kindhearted stamp set - SCORE!
I was not aware that Concord & 9th had a challenge blog until yesterday - so I am just in time - even cutting it close hah! - to submitting my creation.
This month it is all about Sparkle and Shine so I stamped up Hello Lovely and set myself up to watercolour.
These sweet flowers remind me of Vinca flowers, so I watercolored them with a bit of purples and greys and blues.
I wasn't really sure of my finished product - but after adding some Wink of Stella, Diamond Dust Stickles AND some sequins I was sold!
I diecut the Kind die with Royal Velvet cardstock three times, adhered them together and then glued it to the bottom third of the watercolour panel. I stamped the rest of the sentiment and added some sequins and DONE.
Pop on over to Concord & 9th to enter this challenge - but I think it ends today - so hurry!!!
I was not aware that Concord & 9th had a challenge blog until yesterday - so I am just in time - even cutting it close hah! - to submitting my creation.
This month it is all about Sparkle and Shine so I stamped up Hello Lovely and set myself up to watercolour.
These sweet flowers remind me of Vinca flowers, so I watercolored them with a bit of purples and greys and blues.
I wasn't really sure of my finished product - but after adding some Wink of Stella, Diamond Dust Stickles AND some sequins I was sold!
I diecut the Kind die with Royal Velvet cardstock three times, adhered them together and then glued it to the bottom third of the watercolour panel. I stamped the rest of the sentiment and added some sequins and DONE.
Pop on over to Concord & 9th to enter this challenge - but I think it ends today - so hurry!!!
27 Nov 2016
Enjoy Your Watercolour Day!
Good Morning- we are certainly settled in to our winter home and LOVING it! Punta Gorda is just beautiful and the surrounding area is full of antiques and unique stores.
I'm late for the latest Curtain Call Challenge (a natural thing that I do lol) but since I had just finished organizing my crafty space - and my Zig Markers were handy - I decided to use the photo as inspiration regardless.
Using one of Suzy Plantemura's Birthday Notes watercolour sheets exclusively from Simon Says Stamp - and my Zig watercolour markers - I had some fun!
These sheets are 4 1/4" X 5 1/2" - so after watercoloring, I trimmed down the panel and popped it up onto MFT Natural cardstock base, wrapping some MFT hemp cord around the panel before adhering. This twine is so popular that is is always out of stock - GAH!
Thank you for coming around - I hope to blog more often this winter now that I am situated again whew!
I'm late for the latest Curtain Call Challenge (a natural thing that I do lol) but since I had just finished organizing my crafty space - and my Zig Markers were handy - I decided to use the photo as inspiration regardless.
Using one of Suzy Plantemura's Birthday Notes watercolour sheets exclusively from Simon Says Stamp - and my Zig watercolour markers - I had some fun!
These sheets are 4 1/4" X 5 1/2" - so after watercoloring, I trimmed down the panel and popped it up onto MFT Natural cardstock base, wrapping some MFT hemp cord around the panel before adhering. This twine is so popular that is is always out of stock - GAH!
Thank you for coming around - I hope to blog more often this winter now that I am situated again whew!
18 Sept 2016
I think you are Amazing!
It's all about the Rainbow Connection this week at The Card Concept and I'm so happy that another of my favourite challenges is back after their summer hiatus....yippee!
The inspiration photo is fabulous but isn't it always?!!
I really was mesmerized (I know!) by the cascading lights so my idea was to mimic it as much as I could.
I watercolored a sheet of watercolour cardstock using my Zig Real Brush markers. I just swiped the rainbow coloured markers across the paper horizontally, and then waterspritzed the heck out of it! I had to use a paper towel dab up some of the water - but with those fabulous markers, the colours just melded together quite nicely!
After it dried, I diecut using Papertrey Ink's Cover Plate: Scallop Die. It's has kind of a wonky funkiness to it that I love. I adhered that to a white cardstock base.
Next, I diecut and stamped the leaves twice from Stylized Autumn, trimming them so they could fit nicely under my "Amazing" sentiment from It's The Thought Die. I diecut "Amazing" twice - once in black and once in white and adhered them together, offsetting a bit to form a shadow.
The stamped sentiment is from the Make it Market Kit: Nostalgic Notions.
I finished by adding some beautiful Sparkling Clear Sequins from Pretty Pink Posh - a perfect embellishment!!
Thank you for visiting again today!
26 Aug 2016
August Inspiration with Altenew in Pink!
Good day!
Every month Altenew has an inspirational challenge, with adjoining colours that you can choose to use - or not - and I decided to join in the fun.
This month it is all about the pinks and grays... lovely!
Using Versafine Black Onyx ink, I stamped the Sketchy Rose onto watercolour cardstock, followed by the stem and the sweet rosebud. Using my Gansai Tambi Watercolours, - I bought my paint set on Amazon - I painted up this beautiful rose.
I added a bit of gray watercolouring around the rose and tucked in the sentiment alongside the rose.
After it dried (completely) I added some Sparkling Clear Pretty Pink Posh sequins for a beautiful effect!.
I adhered a pink strip of cardstock to the edge of the watercolour and popped it up onto Softstone patterned paper - and then onto my Soft Stone card base.
This challenge ends on August 31st so you still have lots of time to enter!
Labels:
Altenew,
watercolor,
watercoloring,
watercolouring
15 Aug 2016
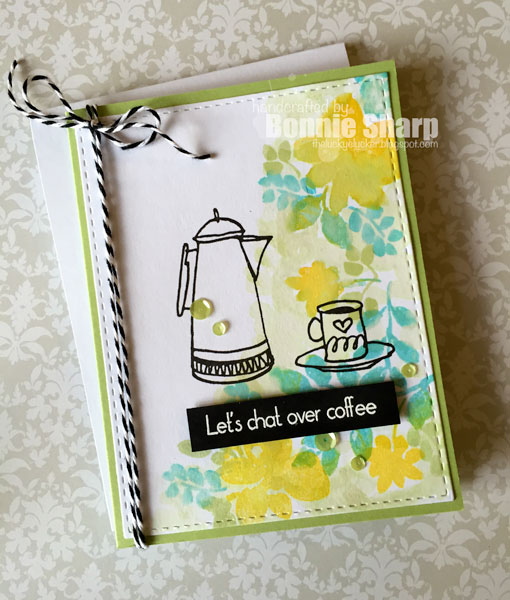
Let's Chat over Coffee!
Wow - the Colour Throwdown is at #405 - crazy!!....and CAS(E) this Sketch works well for my Floral Shadow card!
Here are the colours for Color Throwdown- I'm cutting it soon close (as usual) so this is a short post!
I just received my new Altenew sets, Coffee Love, and Floral Shadow, so of course I had to ink them up!
Altenew Floral Shadow is so pretty and when used as a border, it looks so beautiful!
I stamped along the edge of my cardstock panel with dye inks and then, using a wet paintbrush I moved the ink around for a watercolour effect. Stamping along the edge works well for the CAS(E) this Sketch challenge this week!
I stamped the coffee pot and mug with in Versafine Onyx Black.
I white embossed the sentiment onto a strip of black cardstock and popped it up onto the watercolour panel.
I adhered it to my Spring Moss card base, added some twine and a few (very few!) Pretty Pink Posh sequins.
Here is the sketch for CAS(E) this Sketch!
Here are the colours for Color Throwdown- I'm cutting it soon close (as usual) so this is a short post!
I just received my new Altenew sets, Coffee Love, and Floral Shadow, so of course I had to ink them up!
Altenew Floral Shadow is so pretty and when used as a border, it looks so beautiful!
I stamped along the edge of my cardstock panel with dye inks and then, using a wet paintbrush I moved the ink around for a watercolour effect. Stamping along the edge works well for the CAS(E) this Sketch challenge this week!
I stamped the coffee pot and mug with in Versafine Onyx Black.
I white embossed the sentiment onto a strip of black cardstock and popped it up onto the watercolour panel.
I adhered it to my Spring Moss card base, added some twine and a few (very few!) Pretty Pink Posh sequins.
Here is the sketch for CAS(E) this Sketch!
1 Aug 2016
Colour Throwdown Love!
Good day - another post in the same day - crazy right? If you are looking for my Your Next Stamp post - please scroll down or click on the link!
The colours at Colour Throwdown are so soft and pretty - peach, pink and yellow - what a lovely combo.... and a double challenge creation - because Splitcoaststampers has their Dare to Get Dirty Challenges happening this week - wahoo!.... check it out!
I decided to do some watercoloring - it seems that I really enjoy that medium lately - I find it quite relaxing, so using my Zig Real Brush watercolor markers, I coloured up one of Suzy Plantamura's Every Occasion images from Simon Says Stamp.
I also added some Glossy accents to the two hearts and Pretty Pink Posh sequins - because they are just so pretty - and a great embellishment - very quick and easy! I trimmed up the image and adhered it to Papertrey Ink patterned paper and then onto my yellow cardstock base.
Simon Says Stamp has an Anything Goes challenge this week too and this fits right in!
I have got to get going - we are having family for supper and I need to think about my supper plans - yikes!!
The colours at Colour Throwdown are so soft and pretty - peach, pink and yellow - what a lovely combo.... and a double challenge creation - because Splitcoaststampers has their Dare to Get Dirty Challenges happening this week - wahoo!.... check it out!
I decided to do some watercoloring - it seems that I really enjoy that medium lately - I find it quite relaxing, so using my Zig Real Brush watercolor markers, I coloured up one of Suzy Plantamura's Every Occasion images from Simon Says Stamp.
I also added some Glossy accents to the two hearts and Pretty Pink Posh sequins - because they are just so pretty - and a great embellishment - very quick and easy! I trimmed up the image and adhered it to Papertrey Ink patterned paper and then onto my yellow cardstock base.
Simon Says Stamp has an Anything Goes challenge this week too and this fits right in!
I have got to get going - we are having family for supper and I need to think about my supper plans - yikes!!
18 Jul 2016
July Mix It Up with Neat & Tangled
I decided that I really wanted to colour up my new Neat & Tangled - Say Yes to Donuts - stamp set and so I looked up a video on colouring donuts - I know right? so pathetic - I don't even know how to colour a donut.....ugh.
I found a great youtube video from Not2Shabby and basically copied it - I mean how many ways can there be to colour a donut?! It turns out - many.....
Ellen Hutson's Mix It Up Challenge is with Neat & Tangled this week - so YES! it's kismet honestly....
I coloured up my imaged with my copic markers and die cut them using the available dies - this really is the cutest set ever!
My sentiment is from Essentials by Ellen Up the Happy - I LOVE the funky font in this set! and really - if you are eating donuts - then it's fun, just gotta BE!
I popped up the images onto watercolored cardstock - I used Kuretake Gansai Tambi watercolours to watercolour the background.....easy and FAST - all good.
There are only another day or two to enter this challenge so off I go! Have a little FUN today!
I found a great youtube video from Not2Shabby and basically copied it - I mean how many ways can there be to colour a donut?! It turns out - many.....
Ellen Hutson's Mix It Up Challenge is with Neat & Tangled this week - so YES! it's kismet honestly....
I coloured up my imaged with my copic markers and die cut them using the available dies - this really is the cutest set ever!
My sentiment is from Essentials by Ellen Up the Happy - I LOVE the funky font in this set! and really - if you are eating donuts - then it's fun, just gotta BE!
I popped up the images onto watercolored cardstock - I used Kuretake Gansai Tambi watercolours to watercolour the background.....easy and FAST - all good.
There are only another day or two to enter this challenge so off I go! Have a little FUN today!
14 Jul 2016
CASual Fridays New Release Day 5
Oh boy!---we are getting down to the wire with the new releases from CAS-ual Fridays Stamps - two more days of beautiful creations from all the team members!
For a 15% discount on these stamps (available Friday midnight) or any other product in the CAS-ual Fridays store - see the cute graphic at the end of my post!
Today we are showcasing Mistletoe & Holly, a set with a fabulous array of fun holiday sentiments and a cute little mistletoe image - fun to colour with your copic markers or watercolour paints!
My first card focuses on the mistletoe! I began by stamping the sentiment on white cardstock - and then multi-stamping the mistletoe image, covering the remainder of the card front.
I coloured the images with my copic markers and highlighted some areas with a white gel pen to create a wee bit of interest.
Such an easy way to highlight an image! I added a strip of candy cane patterned paper that has glittered covered score tape across it. And because you can never have too much red at Christmas - I added some swiss dot ribbon to finish!
My second card was watercolored - showing a few different colours for sure!
I clear embossed the new background set Starlequin across the top of my card stock- watercoloring with Zig Real Brush markers in pinks, purples, blues and greens.
I did the same with the mistletoe image, fussy cutting and popping it up onto the card. I embossed the sentiment using Liquid Platinum embossing powder - my new love Lol!
After added a few baubles, I adhered it to my card base using foam tape.
Don't forget if you are interested in receiving 15% off of any of these new releases or any product in the CAS-ual Fridays store - just use my discount code - Bonnie2016! Here is the graphic because it is so cute !!
For a 15% discount on these stamps (available Friday midnight) or any other product in the CAS-ual Fridays store - see the cute graphic at the end of my post!
Today we are showcasing Mistletoe & Holly, a set with a fabulous array of fun holiday sentiments and a cute little mistletoe image - fun to colour with your copic markers or watercolour paints!
My first card focuses on the mistletoe! I began by stamping the sentiment on white cardstock - and then multi-stamping the mistletoe image, covering the remainder of the card front.
I coloured the images with my copic markers and highlighted some areas with a white gel pen to create a wee bit of interest.
Such an easy way to highlight an image! I added a strip of candy cane patterned paper that has glittered covered score tape across it. And because you can never have too much red at Christmas - I added some swiss dot ribbon to finish!
My second card was watercolored - showing a few different colours for sure!
I clear embossed the new background set Starlequin across the top of my card stock- watercoloring with Zig Real Brush markers in pinks, purples, blues and greens.
I did the same with the mistletoe image, fussy cutting and popping it up onto the card. I embossed the sentiment using Liquid Platinum embossing powder - my new love Lol!
After added a few baubles, I adhered it to my card base using foam tape.
Don't forget if you are interested in receiving 15% off of any of these new releases or any product in the CAS-ual Fridays store - just use my discount code - Bonnie2016! Here is the graphic because it is so cute !!
Labels:
Cas-ual Fridays,
Christmas,
copics,
watercoloring
7 Jun 2016
CAS-ual Fridays Florals Challenge!
Hey there everyone - CAS-ual Friday's Challenges are back - and I am creating and watercoloring!
This week our challenge is Florals - and I know y'all have some flowers in your stash --so enter those cards.
CAS-ual Fridays stamps are not needed and there is a $25 gift certificate to the winner BUT if you use CAS-ual Fridays stamps - the prize is doubled!! A $50 gift certificate to the store - woohoo!!
Go and check it out and in the meantime I have some sugar to show you!
I am such a fan - dare I say stalker - of Debby Hughes blog/techniques/watercoloring and when I saw this creation of Debby's I tucked it away to CASE it - so I basically did everything that Debby did - only using CAS-ual Friday's stamps.
I masked and stamped the flowers from Wonderful Words in Versamark Ink and embossed with white embossing powder. I also used the leaves from Pretty Posies in the same manner.
Using my Zig Markers, I watercolored the flowers and leaves, bring in some blues and greens to the leaves.
I stamped and embossed the sentiment in the same manner and then popped it up onto the flowers (ackkk - I have so much trouble covering up part of an image) with a bit of vellum behind.
I trimmed out the image panel and popped it up onto Soft Stone cardstock - just like Debby (I'm shameless). A few sequins were added for effect!
Why don't you join in at the Florals CAS-ual Fridays challenge??!!
This week our challenge is Florals - and I know y'all have some flowers in your stash --so enter those cards.
CAS-ual Fridays stamps are not needed and there is a $25 gift certificate to the winner BUT if you use CAS-ual Fridays stamps - the prize is doubled!! A $50 gift certificate to the store - woohoo!!
Go and check it out and in the meantime I have some sugar to show you!
I am such a fan - dare I say stalker - of Debby Hughes blog/techniques/watercoloring and when I saw this creation of Debby's I tucked it away to CASE it - so I basically did everything that Debby did - only using CAS-ual Friday's stamps.
I masked and stamped the flowers from Wonderful Words in Versamark Ink and embossed with white embossing powder. I also used the leaves from Pretty Posies in the same manner.
Using my Zig Markers, I watercolored the flowers and leaves, bring in some blues and greens to the leaves.
I stamped and embossed the sentiment in the same manner and then popped it up onto the flowers (ackkk - I have so much trouble covering up part of an image) with a bit of vellum behind.
I trimmed out the image panel and popped it up onto Soft Stone cardstock - just like Debby (I'm shameless). A few sequins were added for effect!
Why don't you join in at the Florals CAS-ual Fridays challenge??!!
25 May 2016
Papertrey Ink May Blog Hop
Yep - it's that time again for the Papertrey Ink Blog Hop and I am getting PTI creative whoop whoop!
This beautiful pastel-ly inspiration photo was right up my watercolour alley - so that is where I went this month.
I started by painting a little freehand watercolouring background onto Ranger watercolour cardstock.
And then-- gah!!!--- I hated the blotchy, "out there", waaaay too colourful thing.
However Betsy had a post about watercolour woes vs. watercolour wonders and loving your cards - use them differently blah blah blah - so I took the advice and just cut it up hah... Thank. you. Betsy!
Using the Bitty Butterflies Coverplate, I just diecut my little heart out and am quite pleased with the result -yay!
I cut two of the cover plates - one from the hateful watercolour sheet and one from white cardstock.
I adhered the die cut watercolored butterflies onto the negative space of the white cardstock for my card front and stamped my sentiment which is from the Brushed Blooms stamp set with Smokey Shadow ink.
I splattered Smokey Shadow ink onto the front, hoping it wouldn't make a HUGE mess :) and to mimic the splatters in the inspiration piece.
I tied a bit of ribbon and twine at the top and added a sweet pearl. The butterflies were folded here and there for a bit more interest.
I hope you are enjoying the hop and keep on going - thank you for stopping by!
20 May 2016
Leaping Lions!
Color Throwdown and The Paper Players are in my creative mind today! Colour Throwdown colours are pink, kraft and grey - with whatever other neutral you want to thrown in there - and The Paper Players are looking for wild animals - yay!
I used Reverse Confetti product today - I mean isn't this just the wildest of all animals from in the animal kingdom? - This sweet little lion, from Leaping Lions, looks like he is on a holiday from being mean - just a cutie of an image!
Using Kuretake Gambai Tambi paints - I swashed up a background in pink on watercolour cardstock. I die cut it with Your Next Stamp Stitched Rectangle Die Set.
I coloured Mr. Lion and his little stool with copic markers and then die cut them with the matching Confetti Cuts. Using foam tape, I popped the images up onto the watercolour background.
The sentiment, from Leaping Lions, was stamped in VersaFine Smokey Gray and the hearts are from Reverse Confetti's Weather It Together.
I die cut the banner from Kraft and Smokey Shadow cardstock.
The watercolored panel was adhered to a sheet of Avery Elle Everyday Collection patterned paper - it's full of fun little grey triangles and I tied a bit of twine around the top for TONS of interest....
Glad you could come around today to visit - hurry back now!
I used Reverse Confetti product today - I mean isn't this just the wildest of all animals from in the animal kingdom? - This sweet little lion, from Leaping Lions, looks like he is on a holiday from being mean - just a cutie of an image!
Using Kuretake Gambai Tambi paints - I swashed up a background in pink on watercolour cardstock. I die cut it with Your Next Stamp Stitched Rectangle Die Set.
I coloured Mr. Lion and his little stool with copic markers and then die cut them with the matching Confetti Cuts. Using foam tape, I popped the images up onto the watercolour background.
The sentiment, from Leaping Lions, was stamped in VersaFine Smokey Gray and the hearts are from Reverse Confetti's Weather It Together.
I die cut the banner from Kraft and Smokey Shadow cardstock.
The watercolored panel was adhered to a sheet of Avery Elle Everyday Collection patterned paper - it's full of fun little grey triangles and I tied a bit of twine around the top for TONS of interest....
Glad you could come around today to visit - hurry back now!
11 May 2016
I'm Thinking of You...
Simon Says Stamp's Wednesday challenge has a floral theme this week - and you just know that I am all about THAT!
...and Oh boy- I've found a new-to-me challenge - Pinterest Inspired Challenge! The idea is to be inspired by the photo that was chosen for the month.
This month's Pinterest photo is more of an abstract type - but I made it work for my card - the same colours and the same watercolored feel.
I used one of our new releases from CAS-ual Friday's - Pretty Posies - and the Fri-dies! I just love the possibilities with this stamp set. At the end of my post see how you can save 15% off CAS-ual Fridays stamps and dies - yes I'm shameless LOL!
For this card I used the Pretty Posies Fri-dies to die-cut all the flowers and leaves from post it paper and added them to my 4 1/4" X 5 1/2" watercolour cardstock. Being careful not to get the "masks" damp, I wet the cardstock using a watercolour brush.
I got out my Zig Real Brush watercolour markers and painted a light blue wash all around the "post it" diecuts. When that dried I peeled away the masks and was left with the outlines of the flowers.
I stamped the flowers within the white spots with various colours of dye ink and then using a damp brush I painted over the inked flowers for a more watercolored feel. I suppose when I think about it there is probably a much easier way to accomplish what I was going for Lol, but it was fun to experiment!
The sentiment was white embossed onto a slip of black cardstock and popped up onto the watercolored panel. I added some twine and a strip of patterned paper to the bottom to finish it off!
Don't forget that if you use my discount code "Bonnie2016" (no quotations) over at CAS-ual Fridays, you get 15% off any stamps and dies!!
10 May 2016
The Challenge is Colour!
This week's challenge at The Challenge (hehe) is full of colour! Greens and blues and yellows oh my!
I decided to get out my watercolour paints and one of Suzy's Watercolor Doodles ready-to-watercolour images and PLAY! - I find it very relaxing to putter about with paints - I am no good freehand - nope......but give me an image and I'm all over it!
I used my Gansai Tambi Watercolor set - I love the brilliant colour and yet you can tone them down so easily to make a background wash....
After adding the colour to this fabulous image, I went back over again with a darker shade and added some highlights (lowlights?) to make them pop.
Then I decided to throw in some sweet little YNS gumdrops - they have all sorts of fabulous colours - yay!
Take a boo over at The Challenge and link up with these gorgeous colours!!
I decided to get out my watercolour paints and one of Suzy's Watercolor Doodles ready-to-watercolour images and PLAY! - I find it very relaxing to putter about with paints - I am no good freehand - nope......but give me an image and I'm all over it!
I used my Gansai Tambi Watercolor set - I love the brilliant colour and yet you can tone them down so easily to make a background wash....
After adding the colour to this fabulous image, I went back over again with a darker shade and added some highlights (lowlights?) to make them pop.
Then I decided to throw in some sweet little YNS gumdrops - they have all sorts of fabulous colours - yay!
Take a boo over at The Challenge and link up with these gorgeous colours!!
28 Apr 2016
Fusion Card Challenge - Sweet Orange Blossoms/Hummingbird
Fusion Card Challenge has a gorgeous photo and/or sketch challenge this week - I am still their guest and haven't been kicked out yet HAH!
Are you thoroughly confused by my title and my creation? Me too. Although I love little hummingbirds and how they fly around fighting between themselves, darting all over and causing my family and myself to dive for COVER…..I decided to be inspired by the sketch (sort of).
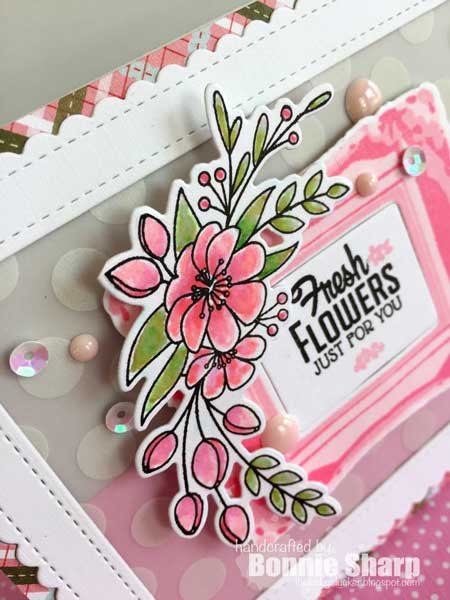
I began by water colouring Clearly Besotted Floral swag from Fairytale Ending and die cutting with the matching dies.
Then, using the gorgeous Neat & Tangled Ornate Frames I stamped and die cut (matching dies) the rectangle frame. On the inside rectangle I stamped one of the sweet sentiments from Papertrey Ink's Petite Places: Main Street Stamp Set.
I popped up the flowers onto the Ornate Frame and them popped the frame and sentiment panel up onto a piece of Polka Dot vellum.
Using the frame from Mama Elephant's Madison Avenue Framed tags - I die cut a white cardstock frame and inlaid it into the negative frame from a piece of patterned paper - clear as MUD?
I laid those frames on top of the vellum which was layered onto half of piece of Lovely Lady and Soft Stone cardstock.
I finished it off by adding a few enamel dots and iridescent sequins.
Thank you Fusion Card Challenge for having me be your Guest Designer for April - my thinking cap was screwed on tight this month!!
Are you thoroughly confused by my title and my creation? Me too. Although I love little hummingbirds and how they fly around fighting between themselves, darting all over and causing my family and myself to dive for COVER…..I decided to be inspired by the sketch (sort of).
I began by water colouring Clearly Besotted Floral swag from Fairytale Ending and die cutting with the matching dies.
Then, using the gorgeous Neat & Tangled Ornate Frames I stamped and die cut (matching dies) the rectangle frame. On the inside rectangle I stamped one of the sweet sentiments from Papertrey Ink's Petite Places: Main Street Stamp Set.
I popped up the flowers onto the Ornate Frame and them popped the frame and sentiment panel up onto a piece of Polka Dot vellum.
Using the frame from Mama Elephant's Madison Avenue Framed tags - I die cut a white cardstock frame and inlaid it into the negative frame from a piece of patterned paper - clear as MUD?
I laid those frames on top of the vellum which was layered onto half of piece of Lovely Lady and Soft Stone cardstock.
I finished it off by adding a few enamel dots and iridescent sequins.
Thank you Fusion Card Challenge for having me be your Guest Designer for April - my thinking cap was screwed on tight this month!!
Subscribe to:
Posts (Atom)