Anybody else having issues with Splitcoast Stampers tonight??
I can't get into the website through the front, side, or back door! UGH!!
Maybe they didn't pay their taxes!! BWAHAHAHAHA!!!
30 Apr 2008


This is what is happening.....
I called the accountant this morning to see if our income taxes were done and he said he still needed more information......which I have.....
Now, why couldn't he have called and asked me.....then I wouldn't have to run around on the LAST day, like a chicken with my head cut off.....ugh!
So I ran the stuff in to his office and he called tonight......we still have to pay.....yuck! I guess that is one of the drawback of farming.
Nothing comes off of your payslip, well because, you don't GET a payslip! You only get paid when you sell our crop, which is in the fall.
Now we are fortunate, since our eggs are picked up out of the cooler every week, so we DO get paid every week - but still, no tax is deducted off of it.
We could make installments, but be damned if I am giving the government any money until I absolutely have to!!
Thank goodness for internet banking.....I can pay tonight at 11:59 pm.....HAH! I'll show them.....
Anyway, hubby has had the camera down at the barn all day taking pictures of his airplane which he is selling {sob!}, so I can't post my picture of the 3-step hydrangea from Kitchen Sink Stamps.
Hopefully he brings it up tonight and I can post in the morning.....
In the meantime, I am going to watch America's Next Top Model and then American Idol (please Brooke, I think it is time - go home already....) haha!
28 Apr 2008
Rummage Birthday!
This is another birthday card that I am putting in the order for my neighbour....
Still using the gorgeous Kim Hughes set 'Nature's Silhouettes' from Cornish Heritage Farms along with 'Beautiful' Stamp Set from THE RUMMAGE BIN and 'Script Essential Expressions' .

I stamped the images all with ink from Papertrey Ink - Berry Sorbet, Aqua Mist, Spring Moss, and Lemon Tart.
I used my blender pen to "paint" in a brighter colour with Summer Sunrise - also from Papertrey Ink - on the yellow daisy on the left hand side.
On the Lemon Tart Cardstock, I stamped the Pretty Pattern background only half way up to give it a subtle change from a plain piece of cardstock.
I roughed up the edges of the "Father's Knows Best" patterned paper and Aqua Mist cardstock - both from Papertrey Ink -with my Heidi Swapp distresser after stamping the images.
I glued both pieces onto the cardbase and added a prima flower with a blingy brad!
I like the spring-y-ness of this card - nice and bright - makes me happy!!
I took my son to the dental surgeon today! He has been suffering from bottom wisdom teeth yuckiness! for the past week so he finally went to the dentist who put him on antibiotics and said "get to the specialist!!"
So I took him today in case they yanked them out right there in the chair and he wouldn't have been able to drive home! But instead they scheduled him for surgery on all four wisdom teeth next week.
I don't envy him at all. I have never had it done but my brother did, and I remember that dog and pony show-- whew!!
Tuesday's are math class for Holly, so I most likely won't be posting tomorrow!27 Apr 2008
U R A HOOT!! and FS64
These Kim Hughes stamps - U R A HOOT! -are so much fun and I love them--why did it take me so long to dive in? I have been stalking these particular stamps since they were released and always deleted them from my shopping cart - dummy am I........
They are so easy to work with, great quality - absolutely fabulous!! I bought them off of the Cornish Heritage Farms website - so  awesome!!
 awesome!!
This card is for the Featured Stamper Challenge on Splitcoast Stampers who is Michelle, aka (Sf9erfan), and today I used this card for my inspiration.
Again, I stamped a backgrounder instead of using patterned paper. I have so much dang paper that I couldn't make up my mind and so I decided I would really stay close to her card and use a backgrounder instead.
I inked up the Large Polka Dot Backgrounder from CHF with tattered rose distress ink on Papertrey Ink's Blush cardstock.
Over that I used the Scratched Grid Backgrounder with Versachalk wheat ink. I didn't like the look of it (you could hardly see it) so I re-inked with Sahara Sand - a bit darker - and stamped again.
It is a very subtle look, but I like it!!
I layered that onto Chocolate Chip cardstock and set it aside.
I stamped the sentiment "my wise friend", and the tree limb in chocolate chip ink on Blush cardstock. I cut out the tree limb and popped it up on the panel above the sentiment.
Don't you just love the limb and all of its paisley pattern!!?
The owl was stamped in Chocolate chip ink on white cardstock and coloured with copics. I drew in a few "feathers" on the wing tips and used some markers and the blending pen to add a bit of depth on his wings and his cute little tummy!! I LOVE this little guy!
I gave him a bit of glittah! on his eyelids with the copic glitter pen- you can see it if you click on the image....then I cut him out and popped him up so he is standing on the tree limb.
I added a white flower and a pink button and glued them down with a glue dot.
I love this card and now I don't ever want to give it away!! I bet you NEVER feel that way about your creations!! LOL!
Pretty Backgrounds
Still playing with my new backgrounds from Cornish Heritage Farms!!
I can't believe I haven't caught on to this background "thing" before now!
Could it possibly be the horrific amount of patterned paper that I have stuffed in my closet???!! nah....

I have a neighbour who has requested some birthday cards, and since I didn't ask if she wanted, funny or pretty, plain or fancy (I'm new at this okay?) I am just going to do an assortment and hope for the best....
My card is GREATLY inspired by Julia Stainton's card and as you can see it is pretty darn close to being copied but she used chalks on her card while I used ink.
This card uses the Pretty Pattern Background from Cornish Heritage Farms.
I inked it up with Spring Moss Perfect match hybrid ink (whew -from now on known as Spring Moss) and then laid my Spring Moss cardstock on top of it and kind of tapped it all over.
The look I wanted didn't quite work out - I probably pounded it instead of tapped - but it is still pretty....
I set it aside and worked on my main image, which IMHO turned out rather nice.
Using Papertrey Ink Lemon Tart Ink, I stamped the Spanish Script Backgrounder from Cornish Heritage Farms on white cardstock - it is very light and you can hardly see it in the photograph, but really, quite pretty in real life!
Then I inked up the images from 'Nature's Silhouettes' Stamp Set from the Kim Hughes Collection with Papertrey Ink's Spring Moss and Blush Inks and stamped them on the white cardstock over top of the Spanish Script.
To get that muted colour look which I love, I spritzed the stamp with a water mist then stamped it on the paper. I sprayed the water in the air and then waved the stamp through the mist - it's fun!
I glued it on the cardbase and then stamped the sentiment "happy birthday" with the new Script Essential Expressions from Cornish Heritage Farms.
I added a prima flower with a dew drop in the middle and the pretty card was finished!!
After reading this over, it does sound like I am full of myself and my beautiful card!! LOL!! Not intentional, but I DO like my creation!!
26 Apr 2008
Kindred Spirits - Rebecca
Another Kindred Spirit from Gina K Designs! She is called Rebecca-and she could be a mom or a grandma or an aunt or a friend or-you get the idea...........
I chose to let her speak for herself, with barely any embellishments so as not to take away from the image.
I stamped the Large Polkadot Backgrounder from Cornish Heritage Farms on the Cantaloupe card base from Memory Box papers. 

I used Summer Sunrise Perfect Match Ink pad from Papertrey Ink to stamp the background.
The flower is cut from a Spellbinders die and coloured with a copic marker. A yellow prima flower is attached and the middle of the flower is a Making Memories velvet brad from the Garden Party series.
I stamped the Kindred Spirit sentiment on Lemon Tart cardstock and adhered it to the image.
Sorry about the rattled post---my MIL drove up the laneway about an hour ago for a surprise visit (why do they do that?!!) so hubby and I were scrambling around before she came in the door -
He said "you get the table, I'll do the countertop!!" Of course there was no time to sweep the floor or pick up the toys (dog) or do any dishes......man.....
She loves us anyway. (she does so)
Kindred Spirits
Yesterday, when I was dragged to the mechanics shop..........AND I had to sit in the truck for 45 minutes waiting for hubby to quit gabbing.....(I knew it) I was able to colour up some images.
Gina K Designs stamps were in the mail the other day so I inked them up and coloured them with my copic ciao markers.

This cute mommy is Anna, running with her baby in the running stroller-or whatever you call it! (thank goodness they didn't have these when I was a young, I mean, younger, mom!)
She is part of the Kindred Spirits line along with the sentiment, at the Gina K Designs website.
The card base is that lovely Memory box paper called Sugar Plum and the designer paper is called Sugar and I got both at Ellen's store. I really can't say enough about the service - fast, fast, fast!!!
I ran the front of the card base through the cuttlebug with the numbers cuttlebug folder and attached the designer paper, coloured image and sentiment with Tombow mono-multi adhesive - love it for EVERYTHING to do with paper!!
The flower is from the large and small cuttlebug flower die.
I stamped a flower image on the small die with a stamp from the Beautiful Blooms stamp set, and then plunked on a bling from Verve Visual!!
A Heidi Swapp ghost flower with more bling was added to the sentiment and then it was done!!
I'm posting another Kindred Spirits later......lunch is calling me!!
25 Apr 2008
I can't even post today!
I can't even post the card I made today because hubby is hollering "WE GOTTA GO!!"
He has to go to Exeter and take in the 4-wheeler to get fixed - heaven forbid the 4-wheeler doesn't work!!
Anyway, he wants some company because it is about an hour and a half drive. So that is kind of sweet, I suppose (begrudgingly). (Could be worse, he might not want to take you anywhere with him --so chuck it up!!)
I've stamped some images to colour while I wait in the truck, while he yacks with the mechanics -worse than women, I swear!
BYE!!
24 Apr 2008
Happy Birthday Case!
ETA: Dork alert!! My daughter Marcie, told me-- in a kind way--- that I was spelling Nichole wrong......I can't freakin' believe it! AND my apologies to everyone who noticed and cringed but didn't say anything......why didn't you SAY something!!
I got a little creative today in a "casing" kind of way!
This card uses three different stamp sets from Papertrey Ink and a backgrounder "Pretty Pattern Backgrounds" from Cornish Heritage Farms.
Papertrey Ink's stamp sets used were "Birthday Basics", "Garden of Life" and "Beautiful Blooms".

I was inspired by this card on Nicole's post, look familiar!!??
I changed up the colours to Spring Moss card base with a Lemon Tart cardstock band.
I stamped the Pretty Pattern Background by Cornish Heritage Farms in Spring Moss Ink on the card base.
The lemon tart paper was glued to Papertrey Ink white cardstock and Happy Birthday from the "Birthday Basics" stamp set was stamped in Spring Moss Ink.
Stamps from PTI's Garden of Life and Beautiful Blooms make up the flowers.
They were stamped on a die cut from the flowers of a Cuttlebug die and then stickles were added in the center of the flowers.
I tied the stitched ribbon around the lemon tart band and adhered it to the card base and I popped up the flowers with dimensionals.
It sure didn't take long (considering I cased the thing) and it is quite pretty IMHO!
I FINALLY got out golfing today!! woohoo! and it was brutal......I sucked big time.....Well, it was the first time out and I forgot to take my golf shoes (incredibly dumb) and - oh I am making excuses!! I need more practise!! YAY!
23 Apr 2008
Showers of Love.....
I finally had time to attempt a Sketch Challenge from SCS today! YAY!
ETA: For goodness sakes, this is also the challenge on Allison's blog Stampin' When I Can!!
ETA: For goodness sakes, this is also the challenge on Allison's blog Stampin' When I Can!!
I started by printing off the sketch and measuring up the layers, because I "intended" to make the measurements exactly as the  sketch.
 sketch.
However, as things go that didn't quite happen, but I came pretty close!
My card base is Memory Box sugarplum and have I said how much I love it!!
It is great for a base because it is coloured on one side and white on the other - so you don't have to worry about gluing white paper on the inside! Fantastic!
The DP is Memory Box 6 x 6 cardstock called "Sugar" and when you purchase it from Ellen's store, as I did, it is so great, because she tells you which colours of cardstock will coordinate with the designer paper! So no thinking involved!!
I LOVE it when I don't have to think! - ummmm.......that didn't come out right..... well, I'm sure you know what I mean.......
I used My Favorite Things stamp set called"Shower Time" for the main image and coloured it with copics.
I paper pieced the umbre lla with the Sugar designer paper and then added clear Glossy accents overtop of it to make it look wet.
 lla with the Sugar designer paper and then added clear Glossy accents overtop of it to make it look wet.
 After it was dry I went over it again and added little blobs to look like raindrops!
I adhered all pieces as per the sketch challenge and then did some faux stitching around the edges with my white gel pen. You can barely see it on the yellow paper.
I had some foam hearts that I coloured with copics and added a teeny Making Memories Garden Party velvet flower brad and then some pretty green Verve Visual bling on top of the flower!
I stamped "Showers of Love" from Papertrey Ink stamp set Favor it Weddings (a fabulous little $5 set) on a piece of paper and made a little tab to add to the image.
All in all, I think it turned out kind of cute!!
21 Apr 2008
Framed Birthday Quote!
I was soooo inspired by Amy Rysavy's Coaster Picture Frame Tutorial and I wanted to do something like that, and not just because I have about 94 coasters (not a word of a lie!).

Well, you know how it goes.....it didn't quite turn out the way I had planned it but I like the finished product just the same!!
I also knew that I wa nted to use my new Anniversary Set from Papertrey Ink. (Sets like these, kind of stump me, so I had to go and blurf around to see what people were doing with it!!)
 nted to use my new Anniversary Set from Papertrey Ink. (Sets like these, kind of stump me, so I had to go and blurf around to see what people were doing with it!!)
I noticed that a lot of Anniversary owners were designing their own paper, so that is what I decided to do!!
I took some Papertrey Ink Spring Moss cardstock and one of the stamps from the Anniversary set and inked it up with Papertrey Ink Spring Moss Ink.
I stamped it in a pattern and embossed it with clear embossing powder. Then I took white ink and inked up another stamp in between to add a bit of depth. It is VERY difficult to see the white ink in this picture, but I think if you click on it you will be able to see it.
I cut out a frame from a chipboard coaster using the scalloped square nestabilities and a smaller plain square nestabilities on the inside. Then I took some My Mind's Eye Paper that I got on sale and did the same thing to it.
I glued the patterned paper to the coaster and had a pretty frame!!
I stamped the sentiment which is from Birthday Basics, Papertrey Ink on a white piece of cardstock and mounted it behind the frame.
I still thought it looked rather bare so I took some more Spring Moss paper and again cut it out with the scalloped nestabilities to make another smaller frame.
I paper pierced around the edges for a little bit of decoration and glued it on top of the frame.

Then I glued the whole frame onto my cardstock that I had designed myself!!
I used a French Script Cornish Heritage Farm backgrounder and stamped some Olive Staz On ink onto a Maya Road sheer blossom.
I finally used a decorative brad that I have been hoarding because someday I may not be able to ever buy embellishments again and so I have to have these brads!! (overboard) and attached it to the frame to decorate it up a bit.
Of course, it still seemed blah......so I took the Martha Stewart edge punch along the bottom of the card, and adhered some white cardstock behind!
Boo hoo!! I didn't get golfing today.....too much to do in the barn.....but maybe tomorrow......oh wait.....tomorrow is math class again for Holly.......well perhaps Wednesday!! Oh please- Wednesday!!
Personally MINE!!!
My hubby and I have three cheque books......


We have one for each business we own and then a personal one.

While I haven't had the word to get my hands on the business ones to alter them (yet!), I AM going to mess with the personal one!
Here is the before - U-G-L-Y!
and here is the AFTER!! 
I started by measuring the cheque book and you can see that there are those little metal corners on the right hand side that I had to avoid.......

I started by measuring the cheque book and you can see that there are those little metal corners on the right hand side that I had to avoid.......
I just decided to incorporate them into the design!
I found this pretty turquoise cardstock in my stash and layered it onto some white cardstock (NOT Papertrey Ink-that is for the GOOD stuff!)
Cornish Heritage Farms has a background blitz on and while I am not entering any challenges, I thought I should start using my backgrounders more so I grabbed the Line Paper backgrounder and inked it up with Papertrey Ink aquamist ink.

The I stamped it all over the turquoise cardstock kind of haphazardly-willy-nilly!!
Oh my goodness, I have so many rub-ons so dug around and found a Basic Grey wholy cow Black floral border and rubbed it in the middle bottom of the turquoise paper.
These Basic Grey rub-ons pretty much just fall off onto the paper - they are just fantastic!!
To balance it out I found this great designer paperfull of numbers, by DCWV from the 12 x 12 Black and White paper stack I have. I measured it up to be like an envelope flap, then I cut it out and glued it on.
I glittered up a Technique Tuesday chipboard circle and splashed a ton of red glitter on top and glued it on the "flap" then added an Autumn Leaves button!
It still looked kind of bare, so back to the rub-ons!! I found some faux stitching rub-ons by DCWV, so I played around with them a bit!
I thought the end result was perfect! although I kind of wish I had used a huge red flower instead of the glitter chipboard.
But then hubby says no flowers......haha!
I hope to get out golfing this afternoon, it is such a beautiful day!! YAY!! finally!!
19 Apr 2008
Fairy Lily Kate....
I received a FUN!! Pay it Forward package from my friend, Ellen, a couple of weeks ago. Ellen owns and operates Actor's - a fabulous restaurant in Petrolia -the same place we meet up with Kraftin' Kimmie and Phebe when we have our awesome lunches!!
In her package, there wer e several stamped images, a mini stamp set, some of those cool bling flowers and a few other goodies! all wrapped up in a yet-to-be-decorated tin!
One of the images was eloise greengrass, from Stamping Bella - she is so sweet and I have seen her coloured up so sweetly on several blogs- so I thought I would give her a go!!
The base of this card is cardstock from Memory Box, and it is so cool because it is heavy enough to be used as a card base (obviously....) and it is coloured on one side and white on the other!! So you don't have to add a white piece of paper on the inside!! Fantastic!
I added a 4 x 4 piece of Basic Grey Lily Kate designer paper (cut from a 12 x 12 sheet - back when I did the limited challenge).
The sentiment is from Papertrey Ink's anniversary set "Simple Little Things" that is NOT available in the store - sorry! I got it because I bought at least 12 sets in their first year - so anyone who had bought twelve sets of stamps received a free set - isn't that generous!!
Eloise was coloured with copics and decorated oh-so-shparkly!! with frosted lace stickles!! I love stickles, although I generally get them everywhere because I am not very patient when it comes to letting it dry!! LOL!
She was trimmed with Papertrey Ink Swiss dot spring Moss satin ribbon (whew-that's a mouthful!!) a Making Memories felt flower and a Prima flower.
The center of the flower is a bling brad and beside the sentiment is some more pretty pretty bling from Verve Visual!!
I finally took my taxes in yesterday YAY!! a freakin' load off my mind!! (In Canada, we have until the 30th.....) so to celebrate I went on to the golf course and paid our membership.....so.....maybe this afternoon, hubby and I can go out for a round of golf!! Whoot!Whoot!!
In her package, there wer
 e several stamped images, a mini stamp set, some of those cool bling flowers and a few other goodies! all wrapped up in a yet-to-be-decorated tin!
One of the images was eloise greengrass, from Stamping Bella - she is so sweet and I have seen her coloured up so sweetly on several blogs- so I thought I would give her a go!!
The base of this card is cardstock from Memory Box, and it is so cool because it is heavy enough to be used as a card base (obviously....) and it is coloured on one side and white on the other!! So you don't have to add a white piece of paper on the inside!! Fantastic!
I added a 4 x 4 piece of Basic Grey Lily Kate designer paper (cut from a 12 x 12 sheet - back when I did the limited challenge).
The sentiment is from Papertrey Ink's anniversary set "Simple Little Things" that is NOT available in the store - sorry! I got it because I bought at least 12 sets in their first year - so anyone who had bought twelve sets of stamps received a free set - isn't that generous!!
Eloise was coloured with copics and decorated oh-so-shparkly!! with frosted lace stickles!! I love stickles, although I generally get them everywhere because I am not very patient when it comes to letting it dry!! LOL!
She was trimmed with Papertrey Ink Swiss dot spring Moss satin ribbon (whew-that's a mouthful!!) a Making Memories felt flower and a Prima flower.
The center of the flower is a bling brad and beside the sentiment is some more pretty pretty bling from Verve Visual!!
I finally took my taxes in yesterday YAY!! a freakin' load off my mind!! (In Canada, we have until the 30th.....) so to celebrate I went on to the golf course and paid our membership.....so.....maybe this afternoon, hubby and I can go out for a round of golf!! Whoot!Whoot!!
18 Apr 2008
Stationary for Mom.....!
Boy, was there a bunch of great projects this week in blogland!! and this is a loooonggg post, so pull up a chair and relax!!
Michelle Wooderson has a fabulous stationary set that she made up for her daughter, and I know my mom would love it for Mother's Day too!!
I actually thought I would buy the K & Company paper that Michelle used so that it would be exactly as pretty as her's .....but......(and I am sooo proud of myself!) I used some paper I already HAD!!
It was in a pack of paper that I received with a handy dandy Generations scrapbook tote - I take all my supplies in it when I got to Marcie's house to play!!
The base of the card is Berry Sorbet Perfect Match cardstock by Papertrey Ink. I cut 5 sheets of 8 1/2" x 11 in half, some lengthwise and some cross wise, scored them at the halfway point and folde d them.
I cut a 12 x 12 sheet of DP into 9 pieces , each 4" x 4", and adhered them to the top of the card base and set them aside.
My Technique Tuesday Williamsburg small alphabet is not as teeny as the Simple Alphabet, that Michelle used, so I only spelled out "from my desk".
I stamped that on 4" x 1" strips of white cardstock and glued it to the bottom of the Berry Sorbet cardstock.
I stamped my Big Ol' Backgrounds Polka Dot stamp from C.C. Designs, with Pineapple Ink by Paper Salon on the yellow paper, also from the Generations tote, and cut it into 4 1/2" x 1" strips and adhered it on top of the card, in between the dp and the sentiment-- KWIM?
I used my nestabilities to cut and emboss white circles and Berry Sorbet scalloped circles and stamped my mom's initial on the front -"J" for Jessie -with the Ambassador Monogram Stamp Set from Papertrey Ink.
Then I stamped the dotted circle with the Borders and Corners Circles Stamp set and popped it up on the card and it was done!
I was able to make 9 cards - an odd number for sure - but I packaged up 4 cards for my mom and then 5 thank you cards for my friend who is having a ROTTEN time right now.

The "thank you" sentiment is from "Simple Little Things" - the FREE Anniversary set from Papertrey Ink --such a freaking COOL set!! with several sentiments and images for your use!!
I also used Boxes, Bags and Tags for the tag and Limitless Labels to stamp on the "for you" sentiment!
I packaged them up in a clear stationary box that I got from Papertrey Ink awhile ago. I can't find them now but I think they still have them. If I find them I will provide the link.
I tied it up with some Berry Sorbet swiss dot satin ribbon and attached the tag
Way back when- a loooonngggg time ago, I used to make jewelry and I have a ton of beads and charms and tools left over, so I scrounged through and found the "Faith" charm and attached it to my friends ribbon, just for a little bit of comfort.
I used 7 different stamp sets on this set-but it didn't seem like I was switching sets all the time! It was all fun to see it come together!!
Michelle Wooderson has a fabulous stationary set that she made up for her daughter, and I know my mom would love it for Mother's Day too!!
I actually thought I would buy the K & Company paper that Michelle used so that it would be exactly as pretty as her's .....but......(and I am sooo proud of myself!) I used some paper I already HAD!!
It was in a pack of paper that I received with a handy dandy Generations scrapbook tote - I take all my supplies in it when I got to Marcie's house to play!!
The base of the card is Berry Sorbet Perfect Match cardstock by Papertrey Ink. I cut 5 sheets of 8 1/2" x 11 in half, some lengthwise and some cross wise, scored them at the halfway point and folde
 d them.
I cut a 12 x 12 sheet of DP into 9 pieces , each 4" x 4", and adhered them to the top of the card base and set them aside.
My Technique Tuesday Williamsburg small alphabet is not as teeny as the Simple Alphabet, that Michelle used, so I only spelled out "from my desk".
I stamped that on 4" x 1" strips of white cardstock and glued it to the bottom of the Berry Sorbet cardstock.
I stamped my Big Ol' Backgrounds Polka Dot stamp from C.C. Designs, with Pineapple Ink by Paper Salon on the yellow paper, also from the Generations tote, and cut it into 4 1/2" x 1" strips and adhered it on top of the card, in between the dp and the sentiment-- KWIM?
I used my nestabilities to cut and emboss white circles and Berry Sorbet scalloped circles and stamped my mom's initial on the front -"J" for Jessie -with the Ambassador Monogram Stamp Set from Papertrey Ink.
Then I stamped the dotted circle with the Borders and Corners Circles Stamp set and popped it up on the card and it was done!
I was able to make 9 cards - an odd number for sure - but I packaged up 4 cards for my mom and then 5 thank you cards for my friend who is having a ROTTEN time right now.

The "thank you" sentiment is from "Simple Little Things" - the FREE Anniversary set from Papertrey Ink --such a freaking COOL set!! with several sentiments and images for your use!!
I also used Boxes, Bags and Tags for the tag and Limitless Labels to stamp on the "for you" sentiment!
I packaged them up in a clear stationary box that I got from Papertrey Ink awhile ago. I can't find them now but I think they still have them. If I find them I will provide the link.
I tied it up with some Berry Sorbet swiss dot satin ribbon and attached the tag
Way back when- a loooonngggg time ago, I used to make jewelry and I have a ton of beads and charms and tools left over, so I scrounged through and found the "Faith" charm and attached it to my friends ribbon, just for a little bit of comfort.
I used 7 different stamp sets on this set-but it didn't seem like I was switching sets all the time! It was all fun to see it come together!!
16 Apr 2008
Blog Candy!!
No, not me silly! I just had some!
It's Lim--- LIM is having some blog candy and it is soooo very sweet!!
Her blog is called The voices in my head....Lim's blog. so go over and put your name in --for not 1, not 2, but 3 VERY cool prizes!!
It's Lim--- LIM is having some blog candy and it is soooo very sweet!!
Her blog is called The voices in my head....Lim's blog. so go over and put your name in --for not 1, not 2, but 3 VERY cool prizes!!
Curvy Sweet Pea!
This is the most adorable stamp that I am using today from Lockhart Stamp Company!
It is called Sweet Pea and I bought it at Ellen Hutson's store, which, by the way is called Ellen Hutson LLC!!
I bought a new edge pun ch at Michael's because I had a 20% off coupon off the ENTIRE purchase!!
 ch at Michael's because I had a 20% off coupon off the ENTIRE purchase!!
 So I took advantage and bought a few things.....namely this Martha Stewart border punch. I love it!
The sentiment is from Stamping Up and is from the set called Curvy Verses.
Cardstock and ribbon is Sweet Blush from Papertrey Ink Perfect Match collection and the DP is DCWV Nana's Nursery Baby Girl pack.
I cut and embossed the image with nestabilities and then cut and embossed the scalloped edge.
A few paper piercing holes and some white gel pen and it is done and soooooo dang cute!!
15 Apr 2008
Get Comfy Socks....!!
I am still having so much fun with these Lockhart Stamps!!
I just can't say enough about the quality and crispness of the images when I ink them up and plunk them on the paper! LOL! Plunk....now that's a word!!

Both of these stamps - image and sentiment - are from Ellen Hutson's store and I received them in just a couple of days from ordering! Fantastic Service!!
I decided to get my Autumn Leaves buttons out because flowers and socks together - well, it just doesn't do it for me!
Basic Grey Boxer paper was attached to a Kraft base and then some ribbon from my tiny stock- yeh right!
I glued the buttons on with glue dots sort of haphazardly - it is pretty early in the day for that word!!
The image was coloured with copics and then sponged with Chocolate Chip ink.
I did some faux stitching along the orange coloured paper with a Tombow marker!
Tombow!! you say.......I used Tombow because it has a nice hard nib on the end to follow those pierced holes....fabulous!
I popped up the image with some dimensionals and added the sentiment and done!!
Cute little card in no time at all!
14 Apr 2008
Happy Birthday To Baby Sis!!
It was my baby sister's birthday yesterday and I forgot all about it!! YIKES!!
I made her a card and it will just have to be late.......
I just love this Berry Sorbet paper from Papertrey Ink - it is such a beautiful deep pink - yes I know it looks kind of orangy but that is how i t photographs - I promise you - it is gorgeous!!
Last week's New Technique Challenge on Splitcoast Stampers was to stack ribbon - I know I am late with this but there is an old saying that goes something like this -----better late than never!! (not sure if you have ever heard that or not - hee hee!)
I used 5/8" saddle stitched Berry Sorbet ribbon with 1/2" white grosgrain ribbon on top.
It is hard to see in this photograph, but I love the way the stitching peeks out on either side of the white ribbon!
I usd the Berry Sorbet cardstock for the card base and a strip of the Pink Patterns Patterned Paper on top.
I used my corner rounder without the guard to make the scallops on the patterned paper.
The teeny weeny itsy bitsy - really bitsy for these ol' eyes! - flowers are from the leftovers of my Fiskar's border punch!
It leaves teeny weeny its......well....you know what I mean......flowers all over and I wanted them for this card!
I attached 1/4" double sided tape to the "stacked" ribbon and adhered it along the top of the patterned paper.
Then I added the "Happy Birthday" sentiment from Papertrey Ink's Birthday Basics!!
TA-DAAAA!!
Don't forget there is another release tonight from Papertrey Ink!
Three more stamp sets and a mini set!! woohoo!!
I made her a card and it will just have to be late.......
I just love this Berry Sorbet paper from Papertrey Ink - it is such a beautiful deep pink - yes I know it looks kind of orangy but that is how i
 t photographs - I promise you - it is gorgeous!!
Last week's New Technique Challenge on Splitcoast Stampers was to stack ribbon - I know I am late with this but there is an old saying that goes something like this -----better late than never!! (not sure if you have ever heard that or not - hee hee!)
I used 5/8" saddle stitched Berry Sorbet ribbon with 1/2" white grosgrain ribbon on top.
It is hard to see in this photograph, but I love the way the stitching peeks out on either side of the white ribbon!
I usd the Berry Sorbet cardstock for the card base and a strip of the Pink Patterns Patterned Paper on top.
I used my corner rounder without the guard to make the scallops on the patterned paper.
The teeny weeny itsy bitsy - really bitsy for these ol' eyes! - flowers are from the leftovers of my Fiskar's border punch!
It leaves teeny weeny its......well....you know what I mean......flowers all over and I wanted them for this card!
I attached 1/4" double sided tape to the "stacked" ribbon and adhered it along the top of the patterned paper.
Then I added the "Happy Birthday" sentiment from Papertrey Ink's Birthday Basics!!
TA-DAAAA!!
Don't forget there is another release tonight from Papertrey Ink!
Three more stamp sets and a mini set!! woohoo!!
13 Apr 2008
Happy Retirement!
This card came together rather quickly, AFTER I quit mulling about the paper, the ribbon, the sentiment etc etc etc.
Is anyone else like that?
The stamp is a Lockhart stamp that I bought from Ellen's store (ya, I get to call her Ellen).

I stamped the slippers on Papertrey Ink Stamper’s Select White Cardstock and then again on the Basic Grey Boxer paper so I could paper piece them.
I coloured the rest of the slippers with copics and then pieced the toes of the slippers on and adhered the image to the brown paper also from the Boxer line of Basic Grey.
The base of the card is Papertrey Ink's Perfect Match Quality Cardstock Spring Moss with a complimentary piece of Boxer paper glued to it.
The "Happy retirement" sentiment is from Papertrey Ink's Mixed Messages, and the "life's simple pleasures" is from Papertrey Ink's Shapes by Design.
The ribbon is MY stock ribbon and is actually a lot closer to the Boxer background colour in real life - sometimes cameras take the silliest pictures!!
12 Apr 2008
Sunshine Butterfly!
This pretty little butterfly is from Sunshine Designs!
It was one of their cubes that also has three other butterflies. Marcie had it and I was able to sta mp it when I was babysitting Jake!
We are so darn lucky we are able to do that!
Sunshine Designs offer their stamps singularly on cling mount along with their well known cubes!
They have idea sheets also so that you can figure out how to colour them if you like.
I didn't have a butterfly sheet so I had to "wing" it - get it?? WING it!! LOL!
I used Memory Box patterned paper called Aerial and the mango and jade cardstock is also Memory Box. Both are from Ellen Hutson's store.
edited: the orangy cardstock is canteloupe, not mango.....
 I coloured the butterfly with copics and did some highlights on it with my Sakura colour glitter pens - this picture shows the pretty glitter!! You can click on it to get a better look!
The sentiment is Curvy Verses from Stamping UP! and the flowers are prima with a glittery brad in the middle!
It was one of their cubes that also has three other butterflies. Marcie had it and I was able to sta
 mp it when I was babysitting Jake!
We are so darn lucky we are able to do that!
Sunshine Designs offer their stamps singularly on cling mount along with their well known cubes!
They have idea sheets also so that you can figure out how to colour them if you like.
I didn't have a butterfly sheet so I had to "wing" it - get it?? WING it!! LOL!
I used Memory Box patterned paper called Aerial and the mango and jade cardstock is also Memory Box. Both are from Ellen Hutson's store.
edited: the orangy cardstock is canteloupe, not mango.....
 I coloured the butterfly with copics and did some highlights on it with my Sakura colour glitter pens - this picture shows the pretty glitter!! You can click on it to get a better look!
The sentiment is Curvy Verses from Stamping UP! and the flowers are prima with a glittery brad in the middle!
Sympathy Cards.....
My mom asked for an order of Sympathy cards but it seems as soon as I get a few ahead, I am the one who needs them......and this week has been particularly tough......hence the lack of posts......

Hopefully back to some normal-cy around here now, for our family anyway.
I used the same stamps and paper for all three of these cards, making them a quick make!
I received my order from Ellen Hutson last week and I have to say that I am so pleased with her service! Very personal and super duper quick!!
Always fun to deal with, because you know that when you place your order you will get it before you have forgotten what you ordered KWIM??
All three cards used Basic Grey LilyKate 6 x 6 paper pack from Ellen's store. I have the 12 x 12 also but the detail in the smaller packs is fabulous!
I also used Lavender Memory Box cardstock which is so cool because it is white on the backside an d quite heavy so you could use it for your card base!
The flower stamp is Happy Harmony from Stamping UP! and the sentiment is from Printworks.
My card base is Spring Moss cardstock from Papertrey Ink, as well as the Spring Moss satin ribbon. The lavender ribbon is from Offray.
Hopefully this week will be better for our neighbourhood. We are a very close community thankfully, and so with that, along with our Faith, I am positive that the mending can begin......

Hopefully back to some normal-cy around here now, for our family anyway.
I used the same stamps and paper for all three of these cards, making them a quick make!
I received my order from Ellen Hutson last week and I have to say that I am so
 pleased with her service! Very personal and super duper quick!!
 Always fun to deal with, because you know that when you place your order you will get it before you have forgotten what you ordered KWIM??
All three cards used Basic Grey LilyKate 6 x 6 paper pack from Ellen's store. I have the 12 x 12 also but the detail in the smaller packs is fabulous!
I also used Lavender Memory Box cardstock which is so cool because it is white on the backside an
 d quite heavy so you could use it for your card base!
The flower stamp is Happy Harmony from Stamping UP! and the sentiment is from Printworks.
My card base is Spring Moss cardstock from Papertrey Ink, as well as the Spring Moss satin ribbon. The lavender ribbon is from Offray.
Hopefully this week will be better for our neighbourhood. We are a very close community thankfully, and so with that, along with our Faith, I am positive that the mending can begin......
11 Apr 2008
Blog Candy Winner!!
Random Integer Generator
Here are your random numbers:40
Timestamp: 2008-04-11 16:46:01 UTC
Val said...
#42 Congrats on reaching 10K hits! What an accomplishment. Wonderful blog candy too!
Okay - Val is really #40 - the numbering got really VERY screwy!!
Congratulations Val!
Send me your details through my e-mail (right hand side above my picture - or there abouts) and I will send out your prize!!
YAY! Thanks Everyone for participating!
10 Apr 2008
Don't Forget......!
Don't forget about my blog candy right here on this post....!!!!
I am going to draw it tomorrow around noon, so pop in later on tomorrow and see if you are the winner!!!.....and hopefully I will have another creation!
Cripes!!! I have been running around doing "life" stuff and I can't get into my stamping room! arghghgh!!!
I am going to draw it tomorrow around noon, so pop in later on tomorrow and see if you are the winner!!!.....and hopefully I will have another creation!
Cripes!!! I have been running around doing "life" stuff and I can't get into my stamping room! arghghgh!!!
9 Apr 2008
You Should Cuttlebug Everyday!
Yep......you should cuttlebug everyday!!
Everyday Blessings stamp set from Papertrey Ink that is!.........LOL!
I actually cased this card and I have been madly looking for the blog I cased it from and so far no luck.....but I will let you know when I find her!!
Edit in: Found it!!! Here it is "The Barefoot Stamper"
I embossed the cros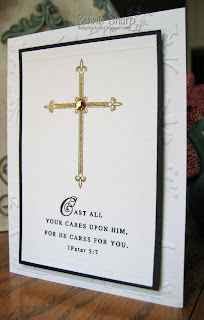 s in gold embossing powder and added a gold bling in the middle - pur-tee huh, huh?!!
I stamped the verse in Brilliance Black and then used my scoring tool to score some lines along the edges......oh my goodness - what I wouldn't do for a Scor-pal!! LOL!.
Then I mounted it on black cardstock and popped it up onto my card base.
I used Papertrey Ink white cardstock for the base, and ran it through the cuttlebug with the Stylized Flowers embossing folder.
It's not too late for my blog candy celebrating 10,000 hits!! The draw is Friday and I even figured out how to use Random.org!!
I will announce it Friday or Saturday so check back and see if you were lucky -----LIKE ME!!!
How smart am I !! - don't answer that.......
Everyday Blessings stamp set from Papertrey Ink that is!.........LOL!
I actually cased this card and I have been madly looking for the blog I cased it from and so far no luck.....but I will let you know when I find her!!
Edit in: Found it!!! Here it is "The Barefoot Stamper"
I embossed the cros
 s in gold embossing powder and added a gold bling in the middle - pur-tee huh, huh?!!
I stamped the verse in Brilliance Black and then used my scoring tool to score some lines along the edges......oh my goodness - what I wouldn't do for a Scor-pal!! LOL!.
Then I mounted it on black cardstock and popped it up onto my card base.
I used Papertrey Ink white cardstock for the base, and ran it through the cuttlebug with the Stylized Flowers embossing folder.
It's not too late for my blog candy celebrating 10,000 hits!! The draw is Friday and I even figured out how to use Random.org!!
I will announce it Friday or Saturday so check back and see if you were lucky -----LIKE ME!!!
How smart am I !! - don't answer that.......
8 Apr 2008
Sunshine Designs....
Marcie got this beautiful floral image at The Paper Pickle the other day and she graciously let me stamp it a couple of times! Of course, when I am looking after Jake I may have to sneak another "couple of times"!!
It's from Sunshine Designs, and it was on cling mount which I just love because you can use your acrylic blocks!! yay!

I used Lavender and Russian Sage Memory Box cardstock that I got from Ellen Hutson's store......gorgeous paper that is white on one side so you can even use it for the base of your card if you want to make one layer cards .....hmmmm.... Fabulous!
You can also see a little wee peek of Berry Sorbet cardstock from Papertrey Ink and of course the swiss dot berry sorbet ribbon with a PTI white cardstock base.
I did a little sponging around the image to let it pop out and used the dotted cuttlebug embossing folder on the background. Luv it!!
Oh my goodness, almost forgot to say I coloured it with ciao copics which I absolutely luv!! I got a 72 marker set off of ebay and am rounding up the rest by belong to the Gina K Designs copic club and I also am purchasing them once in a while from All that Scraps!!
Here and there I dabbled a bit of copic spica glitter pen to make everything shimmer!!
Don't forget about my blog candy celebrating 10,000 hits!! Leave a comment on this post and maybe you can win THE candy!!
7 Apr 2008
10,000 Hits!! Blog Candy!
Thank you each and everyone for making "The Lucky Clucker" so special for me!
It is through the Grace of God that I can actually do this, so thanks be to God! 3 cheers!!
I appreciate every hit and every comment and to show you how much ----I am offering up some cool-i-o blog candy!!
 There is Saycheeseabella from Stamping Bella, Basic Grey 6 x 6 paper pad Sugared, Tombow mono glue, and big white Heidi Swapp flowers- great for colouring with your markers!!
edited: MY GOODNESS!! I can't believe I said she was Clickabella (I changed it)when she is most definitely, obviously, and so very truly Saycheeseabella! Ugh! All those that think I am a dork---please stand up!!!
Just leave a comment on this post , and on Friday the 11th, I will pick a name, and announce it on my blog!!
**I edited this again so that you don't have to leave an email - see 1st edit regarding "being dorky" **
Please number your posts - starting with #1 ;)
Thanks again, everybody!! YAY! Let the fun begin!!
Crap.......
I can't believe I haven't even stamped since last Thursday..........

Well, I am going to get my blood tested today because I think the gremlins have invaded my body......
I see that I have surpassed 10,000 hits!! YAY! Thank you so much everyone!
Of course, that calls for some blog candy!!
I'll be back later to post my candy and hopefully something constructive ...whew.....

Leaving you with something cute that makes me feel better!!
4 Apr 2008
Sorry, sicker than a dog.....
I don't know where that expression came from but, I have been throwing up all day......
Maybe tomorrow.....
Maybe tomorrow.....
3 Apr 2008
The Last Bella......

The last Bella for awhile anyway....
I have sooooo many more to ink up, but I think that is enough for now......unless I want to do another one!! LOL!!
This is Teeoffabella from Stamping Bella again, I just love her and I want to get back to golfing soooo badly, I can hardly wait!!
I chose to colour her with gray hair, because in about 3 weeks or so that will be me!!
The roots will be all in.....I told you I was going to go gray!!
So you are looking at my likeness right there.....well, add a few pounds (well, more than a few! lol!) and a lot shorter hair and -really - lose the socks!!
But the enjoy part is true, true, true!!!
The "enjoy" sentiment is part of Mixed Messages from Papertrey Ink. I cut it out with the small tags die from Cuttlebug!
The ribbon is Aquamist from Papertrey Ink as well as the base of the card!!
The designer paper is Basic Grey Two Scoops and I chose to leave it a bit plainer just for something different!!
Subscribe to:
Posts (Atom)