Pages

29 Sept 2008

A Long Talk and TLC188.....

Today's Try a New Technique Challenge was so VERY cool!!

It was a colourwash batik technique and you can find all the particulars here on Splitcoast Stampers.

I used Cornish Heritage Farms Sophisticated Swirl Backgrounder to make my background (duh)
and sprayed on Walnut Ink antiquing solutions Cherry
Blossom, Willow and Lilac for the background. You were directed to use mini misters but I couldn't find them - wonder why?- so I opted to use these spray inks and I think they worked fine.

I partly sewed on a piece of Making Memories notepad paper to which I stamped the corner clock and swirl from Cornish Heritage Farms Rummage Bin collection - Beautiful and Time to Stamp.


I added a piece of Melissa Frances vintage ribbon, a couple of Prima's with pearls attached and a Heidi Swapp funky little butterfly ghost shape with more pearls attached.

It looked kind of plain so underneath I layered a little butterfly from the Martha Stewart butterfly punch.

The sentiment is from Cornish Heritage Farms Friend Centers and the ink is a combination of Papertrey Ink Poppy and Versacolour Pinecone.

I didn't like just the red colour and I didn't like just the pinecone colour......so I rubbed the Poppy ink onto the stamp after I had stamped it in Pinecone - kwim?? - and it came out a cranberry colour, which was perfect.

Of course, if I had the Cranberry ink - that would have been much easier.....but why take the easy route when you can sweat over the little things!!?


28 Sept 2008

Featured Stamper.....thanks

Today's Featured Stamper is Terry - check out Terry's gallery!

I chose to case this card with three changes as per the challenge rules.

1. I changed the colours of my card
2. I changed the stamp set
3. I used sheer swiss dot ribbon

I used Prism cardstock on my card, which I am really starting to LUV! It is slightly textured on one side, but still so easy to stamp on!


The Kim Hughes set Silhouettes and Silhouettes II were used for my card. I have need a bazillion few 'thank you's" and these were very simple to create. Actually, the first one is never simple - to me - but after that it is good to go! (usually)

I added some May Arts ribbon that I got from the Paper Pickle - YAY!! my LSS that I Luv!!

Paper Pickle was at the London Scrapbook Expo yesterday and isn't it kind of strange how I drove 100 km to shop at their booth when I could have gone 30 km to the store!

The same thing with The Town Scrapper......bought stuff at the expo from Phebe and I could have just shopped there on Monday when I go to visit my mom!

Some people are sooooo weird that way---me!


27 Sept 2008

IC147 From our Family

Here is a quick card that I made tonight - thus the CRAPPY lighting!
ETA: I have changed the photo so NSC (not so crappy)


I made this card for the Inspiration Challenge on Splitcoast Stampers. I was inspired by this room so I got to work as soon as I got home today!!


I Cuttlebugged the Papertrey Ink Sweet Blush paper with my NEW Cuttlebug embossing folder Winter House, and then took my Pearl paint dabber and dabbed all over the embossing.


I added a piece of silver metallic cardstock along the top and zig zagged my sewing all around to make a border.


I added a MM black spiral clip and some Close to my Heart sheer black ribbon to tie a bow.

I glued that onto Memory Box Licorice paper and I was going to leave it like that, but the bottom was too plain! - Again - I don't like plain bottoms!!

I stamped my Little Paper Shop sentiment from the Christmas Wishes set, a new release, in black Staz-on ink ad then NO plain bottom!!


I went to the London Scrapbook Expo today and it was great!! I love seeing so many scrappers and stampers in one place AND luvin' all the same stuff I do (except not when they are at the same booth I am at..... :) )


26 Sept 2008

WT185 Charmed, I'm Sure!

I'm only one day behind on my Splitcoast Challenges, mainly because this is the first one I have done in awhile and it was yesterday's Ways to Use it Challenge - Charmed I'm Sure!

And the point was to use those charms you have laying around or have been hoarding!! Get them out and use them up!

I used a jewellry charm I had called "joy" for this card, which matches this card perfectly!

How joyous is a new baby in anyone's life!! Babies are always a blessing and such a wonderful gift no matter what the circumstance!! JUST SMILE!!

I loved the way this card turned out! although the photography is a little stinky......all shadowy and such.......that's what happens when you take pictures early in the morning!

I stamped the Prism cardstock with Cornish Heritage Farms Scrapblock Perfect Plaid in Antique Linen Distress Ink. Then I stamped over top of it with the Open Plaid Background in Distress Ink worn lipstick to make more plaid.


I coloured the funky little Teddybella from Stamping Bella with copics, sponged around the edges and mounted her on Prism cardstock.

The designer paper is a piece from my stash and I think it is from We R Memory Keepers.....

I tied the wide satin ribbon from Flourishes through the BIG white space on the image and added a wee bit of plaid May arts ribbon. I also added my little charm that says "JOY". It is pretty small.


I added a button and a couple of Imaginisce Corduroy Buttons to the image and popped it up on the base of my card.

The bottom looked plain so I took some MM Blueberry paint and painted up the "X"s and "hearts" from Kim Hughes stamp set "Hugs and Kisses" and and stamped them to the lower corner of the card........you don't want a plain bottom!!

We are having our "wine" buddies for supper tonight....Prime Rib, Garlic Mashes Potatoes, Butternut Squash Casserole, Green Beans, Broccoli Slaw and Cream Puffs with Raspberries and topped with chocolate sauce for dessert! Yummo!!

We bought some wine from our "local" winery Smith & Wilson Estate Wines and we are good to go!!

Friday Free for All!

Today is Friday and that means another Friday Free for All Challenge over at Embellish-It Scrapbooking!

This week Debbie challenged us to make a box in a bag from Stampin' With Di's tutorial here!! I must say Di has soooo many cool tutorials and a fabulous site!!

This one was so fast and easy to make!

I have seen these Box in a bags lately on other sites and LOVED them but had never tackled one before but I took the plunge this week. I have been away and haven't done any Friday challenges for forever!! so it is about time I jumped back in before I get fired!! LOL! (nervous laughter....)

I used some of my Basic Grey Oh Baby Boy 12 x 12 paper for this challenge, and the letters that are included with the pack. I usually don't use those letters, but they fit right in with the theme and they fit on the tag, which is also included!!


I coloured over the letters to make them sparkle a bit with my Martha Stewart glitter markers - be warned!! - they are juicy and runny - but they leave a beautiful effect. I only mean that I don't think I would ever use them for finer work.


I added some orange bling to the tag - because Jake is only going to be 2 and he won't care that there are jewels on them yet!!

We would love to see your Box in a Bag!! Just upload to the Embellish-It Scrapbooking gallery and be sure to use the keyword FC9!! (Friday Challenge 9)

24 Sept 2008

Tagged!!

I have been tagged by Chris and Diane so I better do this thing before I forget...........(I secretly love to be tagged, I'm just pretending to be dragging my feet....lol!)

Tagging Game Rules:
1. Link your tagger and list the rules on your blog
2. Share 7 facts about yourself on your blog some random, some weird.
3. Tag 7 people at the end of your post by leaving their names as well as links to their blogs
4. Let them know that they have been tagged by leaving a comment on their blog


Random facts....


1. It was my birthday on Saturday and I turned 50. I don't like to be the center of attention so I didn't say anything............but I'm saying it now so maybe I do like to be the center of attention...........but I threatened my children with DEATH if they threw me a surprise party so maybe I don't like to be the center of attention..........I truly don't.

2. I once had a dog named Tippy who ate all my Barbie's and friends. Or maybe they were my sister's Barbie's. Anyway, he didn't touch Ken, which proves that men can be annoying.......

3. Linda asked me what my husband's expensive hobbies are so I will share. He flies a real airplane, a 1946 J-3 Cub, he flies remote control airplanes (he "picked" one up the other day and it was $750), he deer hunts, he turkey hunts - which he says is basically ONE hobby because it only takes one change of clothes and one gun - ya whatever, he golfs (that one is okay), and he farms - which also is probably not a hobby since it is our living, but farming is not a money making thing - you do it because you love it. Again whatever......:)

4. My office is a freaking mess....

5. I like to type with dots..............I define them as pauses for effect lol!!, or thinking.........

6. ...............................

7. I am addicted to "America's Next Top Model"...............oh ya.........

I never tag anyone else because I would have to tag EVERYONE!!

But honestly, if you would like to be tagged, consider it done!!

Oh yes, I do have a blogaversary that has passed by. I am going to do some blog candy and I will give lots of time, so you don't have to keep coming back to see if I have it posted or not!! I feel bad that I haven't done it yet, but I am still catching up from vacation...........(those dots are for effect)

It's beginning to look a lot like ...ya know!!

It's starting to look like Christmas around here!

I have got glitter all over the dang place.....but I love it!!

Last night, being Tuesday, was another FREE on-line class at Cornish Heritage Farms!!

I missed a couple of the classes when we were on vacation, but I didn't skip a beat and got right back into the groove!

Last night
Kristine Reynolds provided some inspiration into mass producing cards with glitter!! She outlined all the steps to make a beautiful set of Christmas cards!

There were only TWO measurements in the whole set of instructions, and I, of course, managed to screw up one of them. I get reading so fast and think that I know it all already and skimmed right over the 1 1/4" cut and made my red paper 1 1/2".

Now you wouldn't think that this is too much of a difference, and I managed to hide it quite well, I think, but honestly!! when you are given a great set of instructions, why can't I just follow them??!

So next time Bonnie, smarten up.

Without an
y further self trashing.......here are my glitter-y cards!!


There are actually 8 cards altogether, 4 of each kind, but when I took the picture I only had three snowmen and one tree set done.

Now Kristine's instructions were to tie your Christmas-y the ribbon around the top of the card which look beautiful on her cards.


Since I didn't "listen" and my red piece of cardstock was cut 1 1/2" instead of 1 1/4" I didn't have enough room at the top of my card for the ribbon - so I thought, since I had all that pretty glitter, I would add some more glitter in the shape of a ribbon at the bottom across the seam. ETA: It really is rick rack ribbon - I didn't mean "shape" literally!


It turned out pretty anyway, I think, and really can you ever have enough GLITTER!!?!

NO, you can never have enough GLITTER!! yay!!

Supplies: Stamps: Kim Hughes Heartwarmers, Asela Hopkins Christmas
Paper, Prism cardstock, Papertrey Ink white
Accessories, gold rick rack, Martha Stewart gold glitter, MM green glitter, Martha Stewart punch


23 Sept 2008

Moments and Memories........

Sorry about this post, Blogger has a mind of its own this morning......imagine that!!


Happy Tuesday morning to everyone!!


Today is the day for the new releases at Little Paper Shop.
Hop on over and scoop up those stamp sets!!

While I was on vacation I had stamped a lot of images
and managed to find some time to get some colouring done in our
lap of luxury motel rooms!!

Once in a lifetime right??

I think that was the theme of the whole vacation --
"Well, we will never do this again, so let's do it right"
and then the Visa bill just showed up yeterday - nice homecoming - yuck!

I hope that Visa Bill is once in a lifetime..... LOL!

I stamped this image with Brilliance Black ink and coloured it in with copics,
based on our hotel colours - beautiful soft blues and beiges and browns.

This image and sentiment is from one of the small acrylic stamp sets from
Crafty Secrets and is called "Story of Me"


The background paper is from
DCWV "Once Upon a Time"
8 x 8 paper pack which I thought very appropriate for this image.

I did a bit of distressing to show an old age theme and
sewed only around the three sides to encase the image -----
don't I sound smart??!!

I cut out the border from the DCWV paper
and glued it to the left hand side.

Using the nestabilities I cut out the circle from the designer paper, folded it in half and tucked it in on the side of the image.

I punched a hole in it with my Crop-a-dile and added two small lengths
of this delicious ribbon from Flourishes and tied a knot.

I added a bit of Sakura glitter pen and Stickles
to the background paper,
which I think I was able to capture in this photograph.....

Well, I am off to PAY the bills and start saving for Christmas now.......never ending!!


22 Sept 2008

Christmas Wishes....

All the new releases for Little Paper Shop this month are being "let out" tomorrow!! YAY!

Here is the last stamp set for this release and it is another beautiful winter set called Christmas Wishes and it is such an elegent set!!

I just love this set and when I opened it up I immediately thought of my Memory Box Winterberry paper pack.......


I stamped the bird image in Papertrey Ink's Aquamist and since it is such a light coloured ink I thought it needed to be outlined (now THAT is something I wish I had NOT done....but such is life....)

I stamped the beautiful verse over top of the bird image. I popped up the image with dimensionals and added that beautiful Flourishes ribbon to the side!

If you want to see more of this beautiful stamp set in action, check out the Little Paper Shop blog or the other design team's blog's! You can be sure they are all so awesome!!!

Thank you for checking me out!

I am off to see all the things I missed over on Splitcoast Stampers these past two weeks! I am finally starting to get caught up after being on holidays!!

I think it is more work coming home and catching up from vacation!!

21 Sept 2008

Introducing Snowflakes.......

The next peek at a new set from Little Paper Shop is "Snowflakes" available September 23!!

I started by stamping the snowflakes with Versamark onto an 8 1/2 x 11 sheet of Papertrey vellum.


Then I sprinkled gold/ivory embossing powder on top of the stamped snowflakes and embossed them with my heat gun.

The back of my card is a 4 1/4 x 5 1/2" piece of Papertrey Ink white cardstock.

I cut a strip of the snowflake embossed vellum 5 1/2" x 3 1/4" and, using my Scor-Pal, I scored at the 1/4" and used that as my "tab".

Using red line tape I ran a piece of tape along the inside of the 1/4" "tab" and attached it to the top of the back of the white cardstock. - This is MUCH easier to do than to explain!!!

Then I used the tape again to attach it to a piece of red Prism cardstock that had the sentiment already embossed in white embossing powder.

I stamp and emboss the sentiment on the Prism cardstock before attaching it. It is a known and proven fact that when you attach anything and leave your embossing to the end, through various unknown reasons, it will SCREW UP!! That's why I do it first......

Then I tied white satin Offray around the seam, and it is done. I think I could have used a wider ribbon, but the seam is not an atrociously ugly thing, so if a bit shows, that is all right with me!!

Be sure to check out the rest of Little Paper Shop's design team's creations today!! and all week until the release on September 23rd!!

Cindy
Dawn
Chelsey
Laura
Allison
Renee
Sarah
Julia
Silke
Elyssa

20 Sept 2008

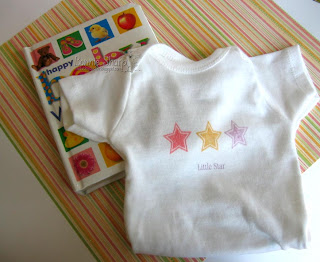
Little Star.............

I decorated a onesie........dontcha just LUV it!!??!

Oh my goodness, it is too easy!


Just lay it out and stamp on it with your favourite stamp set, in this case Little One by Little Paper Shop, with Palette Hybrid Inks and voila!

A little gift for your favourite little someone!!

Little One Preview.......

September 23rd marks another release from Little Paper Shop and this acrylic stamp set is one you will absolutely LOVE for all your precious little one's fabulous events!!

"Little One" is the most darling of baby stamp sets!!

For this card I chose to use the fabulous Cosmos Cricket 8 x 8 Paper Pack called Little Boys! I love it and it was perfect for the card I was making today!


I stamped the plane on Stamping UP Very Vanilla, with Brilliance Black ink and coloured it with copics.

Then I took the star stamp, and using Antique Linen Distress Ink, stamped it off to make the star very light and fairly distressed looking, and stamped it on the page!

(Those directions used the word "stamp" 5 times....I need a thesaurus!)


Isn't that sentiment such a cute pun!

I had some Cosmo Cricket ribbon, so of course I had to incorporate that into the card, along with some Bazzill brads.

Check out the rest of the Design Team's creations today using Little Paper Shop's Little One!!

In a Minute or Two.....

I am going to be posting the Little Paper Shop peek-a-boo shortly.

I just have to get the 77,593 pictures of our vacation off of my camera so I can shoot the picture of the card!

Please come back but in the meantime, do a little blog hopping if you wish and check out the other DT's creations!!

Thank you!

18 Sept 2008

Sneak Peeks! But not me.....yet!

Starting today, there are new sneak peeks for the new stamp sets being released at Little Paper Shop on September 23!!

Since I just got home today YAY! I don't have anythin
g ready, but I will show you the earrings I made for my daughter before I went away.

I used Little Paper Shop's Rock Star stamp set, Cherry Red Staz-On ink and
Polyshrink - a VERY cool "paper" that shrinks when heat is applied!

I stamped the skull from the Rock Star set - yikes - I love this stamp set but I don't like that particular stamp!! but Holly loved it and it did make cute jewelry!!


Start again--- I stamped the skull in Cherry Red Staz-On onto the Polyshrink and then stamped Papertrey Ink's Borders and Corners Circles around the skull.

Using my scalloped circle nestabilities I cut out both the skulls and then punched a hole in the top of the circle where the earring part would go.


Then the FUN part!! I set one of the scalloped stamped circles down on my desk and using my heat gun, I aimed it at the scalloped circle and.........it flew away......


So then I had to hold it down with my tweezers while heating and then it just all heated up into a gooey ball......I really thought that this was the end of the earrings!!

And I was frustrated BUT.....I decided that nothing was lost and I just kept heating it and miraculously (strong word but effectively true) it unfolded itself and went flat again and SHRANK!!

TOO COOL!!


Since I also dabble in making jewelry, I have tons of earring parts, so I put together some earrings and this was the result!

Holly loves them and has been wearing them non-stop over this Hallowe'en season
!

It feels so good to be home!

I am such a homebody and everyday I wished I was home..........I mean, I loved my holiday- the east cost is amazingingly beautiful, but there is no place like home!

17 Sept 2008

Bar-B-Que time!!

Is it still Bar-b-que time?? At Embellish It Scrapbooking it is!

Here is another card I made for the Fall and Fellas theme at Embellish It Scrapbooking.

Click on the link and go down to Fall and Fellas to see all the great creations for the design team!

I used the Verve Stamp set Feeling Groovy for the sentiment and the Spellbinders Apron die for the rest of the card.


I am still on vacation but plan to be back on the 20th!!

YAY! I hope I can still remember how to stamp and scrap!!

15 Sept 2008

For Your Favourite Male Teacher!

Here is another one of the masculine cards I made for the September theme Fall and Fellas, at Embellish It Scrapbooking!

Click on the link and go down to Fall and Fellas!


I stamped the Stamping Bella Professafella in Brilliance Black ink and coloured him up with copics.

The Great Expectations sentiment from Verve Stamps was stamped on the chalkboard, and then I mounted the image on The Basic Grey Archaic paper - perfect for a masculine card!!

A couple of Buttons and done!!

13 Sept 2008

You are Appreciated....

I followed the same idea for this masculine type card from this post, only I changed the papers and the colours!

This card is in the Design team gallery at Embellish It Scrapbooking!!

September's theme is Fall and Fellas, so pop on over and see the rest of the team's creations for some great ideas!!

Follow the links and click on Fall and Fellas to see them!!


Of course, the main image plus the sentiment
is from the Kim Hughes set Making the Grade available at Cornish Heritage Farms.

I am away on vacation, but have preposted about every other day!

We have gone out to the east coast and hopefully the hurricanes stay away from us!!

Thanks for stopping by!!

11 Sept 2008

My Blogaversary!

Ahhh gotcha!!

I am still vacationing on the sunny (I hope) east coast but I thought I would mention that when I come back which should be the 18th or 19th it will be close to my blogaversary!!

YAY!!

It is on September 22nd and I can hardly believe that it has been a year since I started this blog!

I want to thank each one of you readers, whether you are commentors or not! It takes a village to make a .......what is that saying??

It takes a village to raise a child.........I don't know. If that is what it is, then it really doesn't make any sense to what I am saying LOL!!

Anyway, I think I have come a long way in my cardmaking skills since I first started, at least I sure HOPE so!!

But I will have some goodies to give away, things that I have purchased twice (so what!!!?), things I have been given, and things I have just been gathering up for this day!

So hopefully, if all goes well, I will begin my blogaversary on the 22nd!

See you then!

9 Sept 2008

Baby Love Magnets.......

Last week, Kim Hughes had her Tuesday class on Cornish Heritage Farms, and we made magnets!!

They are so cute and such an easy tutorial!

The class called for the Christmas Critters stamp


set, but since I don't have that set, (it's a wonder.....) I had to substitute Baby Love which turned out really cute!!


Check Kim's class it out here!


7 Sept 2008

Another Challenge

This week.... well, I guess EVERY week, Cornish Heritage Farms has a different challenge issued to whomever would like to be challenged!

Last week it was a sketch challenge and I
decided to make a card for it.

Here is the sketch:


and here is my card, and because it is green I LOVE it!!


I used Bo Bunny designer paper that I have had stashed away for the card base and Very Vanilla for the circles.

The gingham ribbon was some I picked up when Michael's had their ribbon on sale - 40% off - even without the stupid coupon because now you have to download it off the internet and I didn't know that when I went there, but, oh well.

I still think that I got a deal. My only question is - WHY oh WHY didn't I buy more!! LOL!

I stamped the mistletoe/holly - is that mistletoe or holly? I think it is holly and it is a stamp from the Kim Hughes stamp set Heartwarmers.

Again.

I stamped the holly in different, off center spots on the circles because the wind was blowing the circles all over my stamp room and they wouldn't stay still long enough to stamp in the middle!

BWAAAHAHAHHAHA!!

Can you tell it is time for a holiday?? Yep FINALLY - hubby and I are away on a much needed - (aren't they always????) vacation!

In fact, by the time you read this we SHOULD be halfway to the East Coast!!

We are visiting relatives in Halifax and hopefully golfing on the coast, providing the Hurricane remnants stay away!!


There is no way I am pre-posting for two weeks straight, but I totally admire those -- Dawn {she said in a jealously loving tone}) who do so!! {insert "admiring" and "I'm not worthy" smiley here}

But I will be pre-posting sporadically through out the two weeks, and who knows, probably maybe hubby and I will get sick of each other and come home early!!

Hopefully you will stick with me and join up when I get back! Luv ya all!

5 Sept 2008

The whole enchilada....!!

Here is the whole card that I was being sneaky about in this post!! You have to travel over to Embellish It Scrapbooking's Design Team's gallery and checked out the awesome masculine and Fall items this month.

This card features the fabulous Fancy Pants design paper - the Papa Collection which is fabulous for masculine cards and for all your Autumn creations as well!

I used the Diamonds in the Rough Cuttlebug folder and then took my sandpaper and lightly roughed it up for a "manly" effect!!


The Verve set Polka Dot Stars was stamped in versamark on to the DP and then embossed with fine gold embossing powder - worked out great - don't you think??!!

The colours are wonderful rich, rusts, golds and blues which compliment this season perfectly!

I am on vacation and won't be back until the 20th or so, but I am trying to prepost some things for you so keep on peeking back to see!!


4 Sept 2008

Masculine Card Gallery...

The Embellish It Scrapbooking Design Team Gallery opens on the 5th, and this month Michelle got to pick the theme.....Fellas and Fall!

I find it a little challenging to make cards for the masculine side, but I have to say that I really enjoyed making them once I got going!


To see all the design team masculine creations, be sure to stop by on Embellish It Scrapbooking tomorrow and check them out!!

Barb sent us some awesome papers to work with this month. The Fancy Pants "Papa" papers
are fabulous to work with and my cards really came together this month - sometimes it's HARD (whiny voice here)!! LOL!

This card uses the Fancy Pants paper with the sentiment built right in - which makes it rather simple!

I'm just giving you a sneak peek at one of my cards!!

I'm sure the Verve lovers will recognize the Verve Polka Dot stamp from this peek. I stamped it on the designer paper and then embossed it with find gold embossing powder! Fun!

Okay, I am off to pack. Hubby is having a freakin' coniption (sp) afraid I won't be ready to go!!
Is he kidding me???!

Have fun!

3 Sept 2008

Challenges, Challenges!

Last night on Cornish Heritage Farms Kim Hughes had a VERY cute tutorial on magnets!

I will show you those at a later post because we are going on holidays on Friday and since I am not a pre-post-for-two-weeks kind of gal I am going to try to stagger my posts and hope that you stay with me!

Anyway, on Kim's tutorial she challenged us to make a card using what we were wearing at that moment as inspiration!!

I was wearing my white golf skirt with green white and yellow striped tank - and yes the stripes were going the wrong way, which just happens to be good for today's sketch on Splitcoast Stampers!!

AND no smart cracks about wearing white after Labour Day either!!


This was a very quick card because I am supposed to be washing clothes and paying bills and packing so we can go away and every time hubby came in I had to pretend that I wasn't stamping! ugh!

I stamped the large polka dot background on Prism paper with whisper white craft ink.

The image is from Kim Hughes Nature's Silhouette and Silhouette Blooms II with the sentiment from Silhouette Blooms II also.

I attached a rust coloured Prima flower and a bit of rust gingham ribbon because I was wearing a rusty old bra - panties were good!!

Off to see Jake today, his mommy has a Dr.s appointment with her obstetrician!! Wahoo!

2 Sept 2008

Delightfully Monochromatic!

I hardly ever do the colour challenge on Splitcoast Stampers because I hardly ever have the right colours! - *cough*lame

But today was monochromatic, which means YES, I have the colour - which is any colour - a whole lot of times!!


I chose the Summer Sunrise colour from Papertrey Ink and the corresponding Father Knows Best patterned paper for my monochromatic scheme - hereafter referred to colour - because typing monochromatic is too long to keep typing!


The sentiment is from Verve Stamps, part of a line of "Plain Janes" which are absolutely gorgeous and nothing plain about them!

I stamped it in Summer Sunrise ink onto a 2 1/2" square of Papertrey Ink white cardstock.


The ribbon is - you guessed it-- Summer Sunrise satin ribbon and yes, the bow is wonky, but
I was too cheap lazy to grab a longer piece and so I had to tie it a million times and this is the lessest wonky I could come up with... LOL!!

It is another gorgeous day in Southwestern Ontario, and the first day of school for "our" kids - meaning the neighbourhood - YAY!

I plan to get outside, get my hands dirty with something other than my beloved ink and do some much needed yard work!!


Have a great day!!

1 Sept 2008

That old Black Magic.....

........that I love so well..... I bet everybody is singing that tune today!! I've been singing it all morning!

That is the name of the
New Technique Challenge on Splitcoast Stampers today!

The Black Magic technique - you need to check it out - it is fun! I chose to use Kim Hughes Making the Grade stamp set, so that I could show off those trees!


And with this Get Happy paper by Cosmo Cricket, it all came together quite easily -in between making lunch, ignoring visiting with hubby, and every other useless household duty that I have to do before, during and after making cards!

Hubby came in wanting to know what the limit is on our debit card - come onnn....I'm BUSY! - - should that be setting off some alarm bells??!

Just leave me some for stamp supplies Okay?!