Pages

31 Oct 2008

Happy Hallowe'en!!

Happy Friday everyone!

I am celebrating Hallowe'en with a Christmas card!!

Today is Friday and that means another Friday Free for All at Embellish-It Scrapbooking.

It is my turn to issue the challenge to the Design Team this week
AND to all of you out there! Please play along if you can and upload your card to the gallery. Use the keyword FC14 so we can find your creation!!

My challenge this week is to use some sort of recycling on your creation!

Oh yes, you know you will have tons of candy wrappers lying around - use them on a card!! Or any little bit of scrapbooking "garbage" - apply it somehow, someway to your altered object!


My little piece of "garbage" is the back of the Prima Painted Petals packaging! So simple - you just have to keep your eyes open to find that perfect thing!

I stamped the wreath from the 2008 Holiday Tags stamp set in the Ocean Tides ink and attached a few little bling-y thing-y's - it killed me to do that - I am SUCH a hoarder!!

Then I punched it out with the Marvy Punch and set it aside.

I embossed my white cardstock with one of the
"Just My Type" Cuttlebug embossing folders - cute little borders that are only about 1/2" wide and there are 5 of them in a package! Very cool.....

I adhered my "garbage" lol! and tied the new Papertrey Ink Ocean Tides satin ribbon around it.

When I attached the image with dimensionals, I decided right then to stop fussing, fiddling and/or dithering about it - like I usually d
o!

Don't forget you are most welcome to try this challenge or any other Friday Challenge we have - there is absolutely no time limit - only for us lol! so feel free to upload your creation any time into our gallery!! If you do my recycling challenge this week - use the keyword FC14!!

I just took a peek and the challenge has yet to b
e loaded - you know those west coast people - probably still sleeping!! I suppose it is still before 6 am!!

Have a safe night!


30 Oct 2008

A CASE of punctuation.......

I love to CASE - Copy And Selectively Edit, Copy And Share Everything, Copy And Share with Everyone, Copy And Steal Everything or check out this link which give you such definitions as Counsel Automated Systems Environment, Computer-Assisted Structural Engineering and even Clean and Sober Experience.

So now, I will show you a card that I chose to CASE. A beautiful card by Lesley Langdon, designer for Cornish Heritage Farms.

This is the card I CASED (scroll down because there are several gorgeous ones in this post).

I love the paper Lesley used and heaven's knows I love the stamp set which is "Winter Vintage Signage".


I used my new K & Company paper pack (40% off - yay!) which has gorgeous distressed papers and perfect IMHO (in my humble opinion) for vintage stamps.

I have noticed that so far in this post I haven't used one exclamation point - well except the the 40% off-yay! - but that doesn't count because it is in brackets.

I went over some of my posts and saw so many exclamation points it was almost ridiculous.

So, at the risk of sounding flat I am not going to use an exclamation point in this post.

Back to the card.


The paper has gorgeous stitching already in it, so I just pieced a few papers together for the background without having to sew - although I wouldn't have minded.

The stitching along the side of the card was stamped with the stitching rubber stamp from the Primitive Christmas set - another vintage-y gorgeous stamp set!! (oops......)

I stamped and cut out the "signage" and popped it up onto the card, then I cut out a snowflake with my snowflake Cuttlebug die, added a button and adhered that to the card.

And finished.........and love it!!!!!!!!!!!!!!!!!!!!!!!!!!!!!!!!!!!!!!!!!!!! -can't do it............!!!!!!!!!!!


29 Oct 2008

Little Paper Shop Monday!

I missed Little Paper Shop Monday and I was going to post on Tuesday after Math Class, but things happened and I couldn't so finally here is Little Paper Shop Monday on Wednesday!

I used one of Jen del Muro's sketches again - some of them are great "go to" sketches and some of them you really have to use your noggin', but this one was good to use!

I used Papertrey Ink Ocean Tides cardstock - love love LOVE this shade of green/blue/turquoise, and I had just been to Michael's and with my 40% off coupon I bought a K & Company pack of paper.

This paper is gorgeous - very distressed looking - you will probably see a lot of it in the coming weeks.........


Using Little Paper Shop stamp set Chirp, I stamped the tree in versamark and embossed it with gold embossing powder - omgoodness, I can't believe how bad this picture is! We have absolutely NO sunlight and I can't take a decent shot without it, obviously.......ugh....

Then I stamped the little birds on top of the tree, followed the sketch, added a sprig of ribbon and voila..... done!!

Thanks for visiting!


28 Oct 2008

Copic Chat, a Discount and a New Look!!

Wahoo! I've got a new look thanks to Beth at Freckled and Fun !

I know you will miss that funky chicken, but a change is as good as a rest, and I was ready!!

I've also got some exciting news from Barb at Embellish-It Scrapbooking!!

"It's a Copic Chat! We'd like to invite you and ALL of your Copic-lovin' friends to join us for a Copic Chat with Emily Laurel, our Copic Representative!

What:
A Copic Chat.....come with all of your questions if you're a newbie or even a Copic wannabe!

When:
Thursday, October 30, 7:00 MST (Mountain Standard Time)

Where:
Right in our forum...c'mon in and join the fun....we're a friendly bunch!

RSVP:
If you can join us, please be sure to let us know where you heard about this awesome opportunity...whether it is here, on a Design Team Member's blog or on a Customer's blog....we want to know! Let us know in this thread!

And, in case you didn't know....
GLITTER is the magic word to get you 20% off of your entire order.....so even though the Copics in the store are PREORDER....who can't use the magic of a sale to add these lovelies to your stash?! We look forward to meeting you!!! "

Doesn't that sound like fun!! I can't be there because hubby has a Lodge supper to attend and he needs a pretty little thing on his arm. Eva Longoria is busy that night so that means I have to attend, but I am sure going to check in on the posts when I get home and read all the tips I can!!

Also, if the sun comes out before I have to take Holly to Math Class, I can take a picture of my new card and upload it to my blog.

I have a Little Paper Shop creation to show you since yesterday was Little Paper Shop day - and I was racing around and didn't have time to make one (of course even though EVERY Monday is LPS day, I had all week to do it but my procrastinator self wouldn't let me!!)

As far as yesterday goes, I had the ultrasound on my right breast, and they said the doctor would call me later this week to give me the results.........for gawd's sakes!!

That could mean


1. Bad news - they don't want to be the ones to deliver that news OR

2. Good news - they didn't find anything and didn't want to waste any more of their time...

Either way, they should have told me because I am going nuts!!

27 Oct 2008

Thank you - like it or not........

I was in a card making frenzy yesterday for a craft bazaar the end of November. It is always a lot of fun stamping cards, but when it is for a sale, it's even better!!

I like the fact that any card is a seller and even if ther
e is one card where you don't especially love the end result, someone else is sure to like it!!

And you know the card I am talking about. The one where it just needs something, and you can't quite put your finger on it, but you have spent so much time on it already, that you put it down and say "I give up!".


That is how I feel with this card - it really needs something to pull it all together, but I am not going to agonize over it any longer!!

This was one of Jen del Muro's sketches from the early summer, and I made this card back then, and put it aside to work on it later. Well, now it is later, and I can't do any more to it!!

I used Cornish Heritage Farms, Kim Hughes set "Making the Grade" and used Cosmo Cricket Little Boys paper, with Memory Box cardstock and Papertrey Ink stampers select for the base.

Off to get another mammogram done today. I had one two weeks ago and then last week I got the call. So I think they do an ultrasound this time. Anyway, that's what's going on.

Maybe, say a little prayer, if you can.


25 Oct 2008

Papertrey Blog Hop - Polka Dots!


I have not been able to participate in the Blog Hops lately and that has been killing me!!!

But I decided this afternoon, that I was going to do it today come h*ll or high water!! - Isn't that a strange saying? If either of those things happened, I would probably not do the blog hop.........

Anyhooooooo........


Here is my contribution - 3 pictures because I couldn't decide which one I liked the best! Do you ever have that delightful problem??!!

The little purse-y bag is from Taylored Expressions and is so cute. It comes in tons of colours, but I chose black so that I could stamp on the dots and emboss in silver!!


I added two little nestabilities cut out hearts, stamped with "Love" and "bride & groom" and tied them to the purse with silver cord.


I tied a big bow with my silver ribbon - which is lovely because it has what I call a "sort of wire" edging that makes it pliable - and then I also have some black and silver satin ribbon, and I tied a bow with that also!

I think these would be heavenly favours at a wedding
!!

Hope you liked it and thanks for looking!!

JC Penny Pink Bedding Inspiration Challenge

Well, this inspiration challenge was bright and cheerful, which is what I need today

The rules - be inspired, and make a card from any of the pink bedding at the JC Penney link provided!

Since I haven't been feeling the greatest, I thought I should KISS (keep it simple silly or sonny or even stupid I suppose) in case I had to run to my best friend lately, the toilet.....(sorry)

I chose to use this bedspread for inspiration and I had just received a Cornish Heritage Farms Broad Stripe backgrounder, so it was perfect to ink up!


Papertrey Ink's Berry Sorbet was the ink that I chose to use and I stamped the backgrounder onto Papertrey Ink Sweet Blush cardstock.

Using my Tombow markers, I coloured onto the Kim Hughes sunflower stamp (yes, I know that sunflower's are not lime green, but today they are!!), huffed it good and stamped it onto the paper.


I cut it out with the Curly label punch from Stamping Up and mounted it onto Berry Sorbet cardstock and then onto Sweet Blush cardstock.

Then I coloured onto the sentiment with my brown Tombow marker and huffed again and stamped.

It looked rather bare, so I grabbed a Tim Holtz grungeboard swirly thing-y, and the Citrus paint dabber and dabbed away. I think I like it now!!

Off to the bathroom - ta-ta!!


24 Oct 2008

Friday Free For All...Cardboard!

Heidi issued a fun Friday challenge at Embellish-It Scrapbooking and that was to use cardboard on your creation!

I went searching for a cardboard box to destroy and really, hubby says in our house that should be an easy job since there are stamping boxes arriving on a daily ba
sis........not true - but I wish!


All of our boxes had been cut down, bundled up and set out at the end of the laneway for the recycling truck, so I hiked outside in my housecoat to the road with my trusty knife (quite a visual for the poor unsuspecting soul on his way to work) and cut off a flap from a box.

I decided to use the cardboard as an embellishment and cut out that huge snowflake with my Cuttlebug snowflake die - I bought this at the London Scrapbook Show and there were so many booths, I don't remember which one - sorry!!


The stamp is Three Wise Men cling mount from Cornish Heritage Farms and was stamped with Papertrey Ink Dark Chocolate.

The card base is Kraft cardstock and I used Tinkering Ink Petite Paper Pack and a bit of Fancy Pants thrown in for the designer papers.

A bit of sponging, bling and pearls and all done! Fast and pretty -just the way I like my men... LOL!! (just kidding, honey..........)


23 Oct 2008

Just One Hope........

The Ways to Use it Challenge today was to use Pink of course, being Breast Cancer Awareness month - yes, I know I forgot yesterday.......yikes......but today I remembered!! AND to only use a one word sentiment.

I used Kim Hughes Mocha Chica PaperPack for my paper, which are sooooo fun because all you do is cut - no stamping!! - well, actually that is n
o fun not stamping, is it, but you know what I mean!!


I just cut the papers and glued them onto the Chocolate chip cardstock base. The scallops are already drawn into the paper!! All I did was add a little shadowing so that they look like they are layers!! Fun!!

I separated the papers with Papertrey Ink Sweet Blush Ribbon and added a few buttons along the side.

I had the Quickutz ribbon die still sitting on my desk from this card, so I used it again and glued the ribbon onto the card.

Using Little Paper Shop's Flourished Dove set, I stamped the word "Hope" in Papertrey Ink Dark Chocolate Ink.

Don't forget to do your breast check in the shower ALL THE TIME! And please have an annual mammogram. Yes, a mammogram is uncomfortable - but guess what? - having a mastectomy is worse!

22 Oct 2008

Oops, it's the Sketch Challenge......

Oops, today is Splitcoast Stampers sketch challenge and I forgot until right this minute that we are supposed to be using pink!

Well, I had to do a baby card for a shower and I don't know if it is a boy or a girl, so I couldn't use pink......


I decorated the bear from the Maya Road Chipboard keychain with paper from Papertrey Ink Bitty Baby Blessings, and added a little spring moss bow.

The base of my card is Papertrey Ink Spring Moss which was run through the Swiss Dot Cuttlebug folder and then the other layers of Summer Sunrise and Bitty Baby Blessings were added as per the sketch.

The flowers and from The Town Scrapper and are those foam flowers called Petaloo. I bought a couple of packages from Phebe when I was there awhile ago and only now opened them - they are pretty cool.

I used a beautiful pearl brad for the center of the flower and then added a couple of Aumtumn Leaves buttons in the corner to balance it off and it is ready to go!

Sorry this isn't a long post, I am still feeling kind of funky............thought I was over it but today it is back with a rotten vengeance. Blech.........

21 Oct 2008

A Crafty Christmas!

I am on my way to Math Class with Holly, but I jut had to show you this pretty little image from the Crafty Secrets Christmas Image & Journal Notes!

Isn't she so cute?! Of course, no stamping, just putting it together - so quick and easy!!

I did try to highlight the image just a bit by tracing around the little girl and some of the background images with my grey copic marker. Since my background colours are so strong and beautiful, she kind of got lost in the colour!


The designer paper is Yuletide Tinkering Ink and just ogle at that delicious May Arts grey sheer ribbon!

The little flowers are form a craft booth at the how I was at this weekend-the lady was just trying desperately to book out of crafting altogether, so everything was being offered for a song!!

Crazy lady! Doesn't she realize that crafting never leaves your blood!!

Talk at you later!!


20 Oct 2008

TLC191, Just a Reminder

Of course you know that October is Breast Cancer Awareness Month, and I know that you know that PINK is the colour for October, so all this week, the challenges on Splitcoast Stampers are going to be based around PINK!! Love it!

Today is also the Little Paper Shop day to stamp yay!!

The technique challenge today was to use our
Twinkling H20's and use them on our image overtop of watercolour pencils.


So I stamped two of the flowers from Little Paper Shop's Floral Wishes onto Papertrey Ink Stampers Select White. Then I coloured them in with the watercolour pencils and went over them with the Twinkling H20's. Look at that shimmer!!


I took my paisley spellbinders die and cut it out twice with the floral paper that I just made, ran the edges around my Brilliance black ink and then sponged with pink ink - the pink ink was already on the sponge so I don't know what kind it was.....so sorry.....

The patterned paper is Paper Salon and the sentiment is from My Favorite Things "Think Pink" stamp set.

I sewed around the egdes with my little Janome sewing machine that I just love.......!!

I used the little bitty Cuttlebug swiss dot embossing folder from the Just My Type folder set. Very cool when you just want a little sliver of your page embossed!!

The Breast Cancer symbol is a Quickutz die and the light pink pearls in the corner are from Ellen Hutson!

Hope you like it!

I was up all night with some kind of "running to the bathroom in the dark every 30 minutes" crud.....crap.......heheh........Feeling a bit better now....just a blazing headache, probably from being afraid to eat anything!......maybe a soda cracker and some tea will help.......poor little ol' me...........

19 Oct 2008

Mega Christmas Cards

I was so very excited last March when I got my first Christmas order for 30 cards!!

Of course, when I was on my 28th card I wasn't s
o excited, but these were pretty, so I said - enough - just finish them already!!

I loved this Flourish stamp set from the first moment I saw Sharon Johnston use this set here. She really is the stamp simply Queen, so I decided I would just stamp simply also, and mass produce at the same time!!


I stamped the tree with Versamark and embossed it with gold/silver embossing powder.

Then I added the gold/silver brads in the corners.

I used Little Yellow Bicycle designer paper and Papertrey Ink Gold Shimmer Cardstock for the first 15 cards and then Fancy Pants designer paper with Papertrey
Ink Silver Shimmer Cardstock for the other 15 cards.


I ran the slice of shimmer cardstock through the Cuttlebug textile embossing folder - I really loved what that cardstock looked like when it was done!!

I tied the silver shimmer ribbon and gold shimmer ribbon around the c
ard in a bow and then popped up the tree image onto the card.


VERY mass-producible!! I delivered them last night and she absolutely loved them (thank goodness!).

She was actually a little surprised that I had them done already!! But now they are out of the way and I can get onto my next project - what ever that i
s!!

Marcie has just reminded me about the craft show the end of November - oh right.......THAT project!! LOL!

18 Oct 2008

My Little CASEd Offering.....

A long time ago in a land far away.........oops, not that one.........sorry.

A long time ago I found this project on Sharon Harnist's PaperFections blog that I LOVED!! so in true CASE fashion, I decided to make one of my own.

I don't have the Itty Bitty Grapes stamp or the Millinery stamp but I do ha
ve the "bottom of my drawer in my stamp collection" bunch of grapes stamp! It is a little larger and so I had to alter my project a wee bit......


Sharon also used the Antique Bookplate 1 die and I only have the Antique Bookplate 2 die. I really am not that good at substituting but the Book Plates are pretty similar I am really happy with the way this turned out!

I loved working with that Spellbinders copper craft foil, very easy, and the Spellbinders die went through the copper pretty well, a couple of passes in the Cuttlebug and it cut through.

I swooshed Timber Brown Staz-on over the copper to give it an old ages look, and set it aside.

I stamped and coloured t
he grapes image, then went around the edges with my Red Krylon pen. I stamped the sentiment from Papertrey Ink Mixed Messages onto the blank part of the stamped image.


Then I backed it onto black cardstock and glued the whole thing onto the foil with red line tape.

I cut a hole in each side of the Book Plate and tied some burgundy ribbon through the holes and tied it around the wine bottle.

Ready to take to supper!!

Off to an outdoor craft show today in Grand Bend - fun and freaking cold!! YIKES!!

17 Oct 2008

Friday Free for All.....Seeing Red!

It was Daniela's turn to host a challenge this Friday at Embellish-It Scrapbooking.

We were challenged to create a card/scrapbook page/altered item using the following:

1. The color red -- LOVE it!!
2. Buttons -- LOVE 'em!!

3. At least one stamp - oh come on!! - those who like them, like them a lot!! (Alexander Keith's motto!!)


I found some of my beloved Basic Grey Figgy Pudding paper left over from last year - how I loved that paper!!

Partnered along with Papertrey Ink Pure Poppy that was run through the snowflakes Cuttlebug embossing folder and some Bazzill cardstock it really came together quite well!

I added a few Autumn Leaves buttons and a couple of tags of ribbon - that were truly just lying around my desk and I picked them up and they matched perfectly!!

The sentiment is from Little Paper Shop set {Christmas Wishes} and it is stamped in Papertrey Ink Dark Chocolate.

I see that the new Basic Grey Wassail is now available in the store and it is just as gorgeous!! along with the Granola, Urban Prairie, and the other Basic Grey paper packs - hurry over before the stock get's low!

Feel free to play along in our challenge today and every Friday!!. Upload to our Embellish-It Scrapbooking gallery and today use the keyword FC12 - (Friday Challenge 12) - when you upload so we can be sure to find your creation!!

Thanks for stopping by!


16 Oct 2008

Winter Door Hangers!!

Well, first of all I would like to thank all of you for the comments on my legs!! I wish I had of known how great they were back in the awkward (could you tell??!) days of being a pre-teen! LOL!

Here is something not so awkward - how's that for a segway??


Cornish Heritage Farms on-line class on Tuesday was a tutorial on making a door hanger. These are just great little ideas to get you on your "jump-start" into Christmas!! These girls have fabulous ideas!!

Using Prism paper and Scrapblock Layers Paperpack

we assembled our door hangers, and here is mine! - almost precisely like Val's - just decorated a bit different.


I love my snowflake and button idea! Well, I can't really claim it because I have seen it around the blog world - but I have never used it before - and I love it!!


Now, here is a question - I know there are blog rules - to give credit where credit is due - and I most certainly try to do that, but what happens when you truly think that an idea was yours and then you see someone else with the same idea. Well, crap.......that's is usually what I think when that happens!!!

And with card layouts - there are certainly only so many layouts around! What is your layout is the same as someone else's and you don't give credit because you thought you did it on your own???!!

I really am baffled by this and hope that you can give me some answers or at the very least a smack on the side of the head..... "QUIT wallowing in your self pity and just do what you do!!!" LOL!

Stamps: Cornish Heritage Farms Heart Warmers
Paper: Scrapblock Layers Paper Pack CHF, Prism cardstock
Ink: Versafine Vintage Sepia, white gel pen, copics
Accessories: twine, stickles, Autumn Leaves buttons, PTI ribbon, Heidi Swapp ghost shapes


15 Oct 2008

Little Paper Shop Vintage Challenge

It's time for another Little Paper Shop challenge!!

This month Allison challenged the design team to create a Vintage card using a Little Paper Shop stamp (naturally)

I chose to use Beautiful Things and kept my card
quite simple - mainly because I forgot about it until this morning! ACKKKK!


Sorry, this is such a quick post! I am going to meet my Grade Eight girlfriends for lunch today!! This is the second annual reunion with these girls we have had.

Talk about vintage! This is a photo of me and my best friend Jayne at Grade Eight Graduation!!


Just to let you know, I graduated from Grade Eight in June 1971 - so needless to say we have all changed a great deal!! But it was funny, we all recognized each other immediately - how weird is that!!

That is me on the right - My mom made this dress for me and I just loved it......there were these gorgeous swiss dots all over it......but oh my gosh......look how short it is!!

Anyway - on to meet the girls! Have a great Day!

Stamps: Little Paper Shop - Beautiful Things
Paper : SU Kraft cardstock, Papertrey Ink Sweet Blush
Ink: SU White craft ink
Misc: Textile Cuttlebug embossing folder, Melissa Francis ribbon, stash buttons, sewing machine,

13 Oct 2008

Beauty of Nature

Today is the last preview for Little Paper Shop's new sets being released tomorrow!!

This new set is called "Beauty of Nature" and it has two Beauty-ful bird images and five wonderful sentiments that you will absolutely love!!


I coloured the bird, thinking that it would be a black-capped chick-a-dee, I used Crate paper's Crate Avenue Collection which has gorgeous shades of ecru and very dark browny gray-y shade - it really is gorgeous!

I used my Leafy Branch Cuttlebug embossing folder on those papers and then added painted flourish from one of the Maya Road little tin suitcase thing-ys!

I painted the flourish with Coal shimmerz,
a beauty-ful sparkly kind of sheer paint that dries in a very short time, enabling you (oh ya!--love being enabled!!) to use your painted product in seconds!!


Here is a close-up of the shimmer......still kind of hard to tell but it is very sparkly and pretty!

I sponged all around the card to make a kind of antique-y look and then added some Prima flowers with grey pearl baubles in the center!!

Love this set and you can see more of it on the Little Paper Shop blog today, or hop on over to all the designer's blogs to take a peek and leave a little comment!

I know they would appreciate it - because I sure do!!

12 Oct 2008

Make a Wish....

Happy Thanksgiving Canada!

Introducing Make a Wish, a new Birthday stamp set from Little Paper Shop, being released, with the other 3 sets, on October 14th!

I finally broke out this Memory Box designer paper called Grove. I bought mine at Ellen Hutson's store, but I think it is out of stock because I couldn't find it to
provide the link.


All the rest of the paper used is also Memory Box and I do have a link for that paper. I know I sound like a stuck record, but I love this paper because it is coloured on one side and white on the other, and sturdy enough to be used as a card base AND you don't have to add a white panel inside because it is already white!! FAB!!

I just stamped my sentiment on white cardstock and kept layering it until I could layer no more!

The fancy punch at the bottom is the Martha Stewart punch and I trimmed the card with Close to my Heart ribbon, yes, and I like it because it has sort of a wiry feel on the edges so you can shape the ribbon a tad!

We went to my mom's yesterday for an awesome Thanksgiving dinner! Don't you just love mom's cooking??! She is terrific because I can NEVER bring anything......she has to do it all herself, so we walk in with our lame bottle of wine - well I still like it, but it feels like nothing.

So, I brought her the Thomas Kincaid candle I made from Cornish Heritage Farms online class that Julia Stainton taught and of course she loved it!! yay!

I love my mom.


11 Oct 2008

Friday's Fall Flourish Free for All!

Suzy's Friday Free-for-All Challenge at Embellish-It Scrapbooking was called Fall's Flourish!

We had to incorporate some kind of flourish into our creation.

I used the Lockhart fishing vest imag
e and coloured it up with my copics. I had some Fancy Pants Papa collection papers left over from September's gallery opening on Embellish-It Scrapbooking, so I sewed some pieces together and ran it through the Cuttlebug using the Leafy Branch folder.


I lightly sanded it up and backed it onto some Chocolate chip cardstock and then stamped my sentiment on another piece of the Fancy pants dp and popped it on.

I tucked some fall leaf embellishments - another one of those things I have had forever! - behind the image.

If you look closely, you can see a couple of Quickutz flourishes tucked in there as well, as per the challenge!

Why don't you accept the Fall Flourish challenge, create something with a flourish and add it to our gallery! We'd love to have you!

Hubby fishes a lot so he actually appreciated this card today! He likes all the cards I make -his exact words are "I like it" every time I ask him what he thinks!

Good answer.

Pocket Notecard Set


ETA: Julia is having a blog candy draw for this Flourishes Dove set. Leave a comment on th
is Little Paper Shop blog post by Monday night when she will choose a winner!!


I saw this idea on Michelle Wooderson's blog and when I received this new Little Paper Shop stamp set I thought it would be a great opportunity to finally give it a try!


They are pocket note cards and the decorated Vanilla sheet just pops r
ight out already for you to jot down your little note, stick it back into the pocket and mail it away!!


Very easy and very pretty!

I followed Michelle's excellent directions and used Papertrey Ink Spring Moss cardstock, Crate Paper Blue Hill collection designer paper and Stampin
g Up Very Vanilla


The ribbon is Papertrey Ink swiss dot, inks are Brilliance Black and Tattered Rose distress Ink.

This stamp set will be available on October 14th along with the rest of the sets being released!

Check out the Little Paper Shop Blog or all the designers today (the list is on the right side of my blog) for their take on this beautiful stamp set!!

10 Oct 2008

Just Flyin' By!

With a new Little Paper Shop stamp set that is!! and TWO cards!!

This is the first preview of our new releases this month, well actually our third, I guess, since we released two new sets on World Card Making Day!!

That seems so long ago, I forgot lol!

This set is called Flyin' By and is a 3 x 4 set with two images and four sentiments.

I have had this Basic Grey Offbeat paper on my desk staring at me and I really liked this sheet with the radishes and peas and other veggies. Love the reds and greens - kind of Christmas-y!


Paper - Papertrey Ink Pure Poppy, Vintage Cream, Basic Grey Offbeat, Prism Dark Willow
Ink - Papertrey Ink Dark Chocolate, Colorbox Olive, copics
Accessories - ribbon, Fiskars Threading Water Paper punch, nestabilities, sewing machine, Cuttlebug swiss dot folder, dimensionals


I also used the Offbeat for my next card! WHA'!!?? Two cards?? I really liked this stamp set and I was having so much fun, I made two cards, which means, of course, that I will have to go like crazy to finish up the other releases, but you have to make hay while the sun shines!!!


This set will be released on October 14th!! Head on over to the other girls' blogs or to the Little Paper Shop blog to see the rest of the previews for this set!!

Paper - Papertrey Ink Sweet Blush, Stampers Select White, Basic Grey Offbeat, Prism Dark Willow
Ink - Papertrey Ink Dark Chocolate
Accessories - ribbon, Fiskars Threading Water Paper punch, nestabilities, paper piercer, dimensionals

9 Oct 2008

Ways to Use a Monogram!

Today's challenge on Splitcoast Stampers, is to create a card using a Monogram.
Check out the details for that challenge here!

Well, since Jake's second birthday is on Saturday (un-freakin'-believable where the time goes)
I needed to make him a card.


Actually, I have already made him a card, but I misplaced it already, -
I only made it Tuesday night....
I know it is in my crap stamping room somewhere!


But this was a great excuse to make him another so here it goes!


I knew I wanted to use Basic Grey Cupcake paper
because it is so perfect for boys with the bright colours and no pinks or purples -
not that there is anything wrong with that - but you know....


So I based my cardstock around the Basic Grey Cupcake,
and found lots of Bazzill cardstock amongst my goodies.
I took some light olive and blu
e Bazzill
and mixed it with Memory Box Red Pepper .


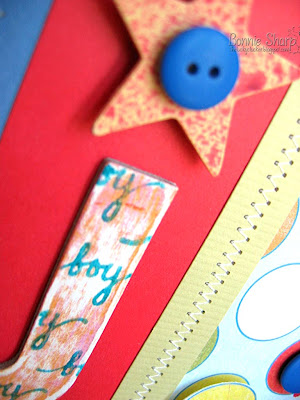
The star is from Melissa Frances chipboard.
I painted it with yellow paint and when it
was dry (tap foot, tap foot, heat gun!!) spritzed it with Red Pepper Color Wash ink.


I considered spraying it all over to make it an orangy colour
but I liked the look of the light bit of spray
so I left it like that.
I heat set it with my heat gun and added the blue MM button.


The monogram "j" is from a HUGE box of chipboard that I got at
Costco a few weeks ago! Fabulous deal!
It was already the orangy colour, but I wanted to stamp on it
so I just sanded it up a bit so the ink would soak in better.

Using Broken China distress ink I stamped the word "boy",
from Kim Hughes stamp set "Sweet Thang"
all over the chipboard letter "j", and then clear embossed it.

With the Cupcake paper, I punched a border with Fiskar's threading water punch,
and attached that paper to the card.
I added a little piece of olive cardstock across the top, and then sewed zig-zag
all around the card and across the middle.

I decided the use the star as the dot over the letter "j" and I think it was a great decision....toot, toot!! lol!


8 Oct 2008

Suisse Joy!

Here is that beautiful Suisse Wreath again from Cornish Heritage Farms in a window card.......

I found this technique in the Cornish Heritage Farms forum under Technique Talk---there are tons of tutorials there for you to try out!


First, I created my card base from Papertrey Ink Spring Moss cardstock. Then I cut a 5 1/2" x 4 1/4" piece of Basic Grey Boxer and lined it up on the front of the card.

Using one of the rectangle nestabilities, I ran both of the papers through my Cuttlebug, together at the same time, so that your windows will match up at the end...........that is important.......I didn't follow this step of the tutorial the first time and....well.....bah.....it was messy....

I glued a piece of clear card sheet to the front of my spring moss card base. - sounds wierd, but keep reading.

This is where I deviated a bit from the tutorial. I chose to stamp and decorate rather than colour with the copics, but that's okay I'm sure!

So, I stamped the wreath onto the clear card sheet with Cherry Red Staz-on and decorated it with some blue and green crystals and pearls!! Blingin' it up!!

Then I glued the Basic Grey Boxer paper (the one with the rectangle cut out) to the front of the card, over top of the acetate, there-by hiding the edges of the clear sheet!!

I did some faux stitching and added a couple of Prima's.

Then I stamped the word "joy" from the Heartwarmers stamp set on the inside of the card, so that when the card is shut, the sentiment is showing!!

Cool eh?

When you sign the card, just make sure that you sign at the bottom so that when the card is shut you don't see your signature through the acetate......I'm just sayin'!!