The Challenge has a fun and bright inspirational photo this week! I love this Challenge - every week of the month there is a different rotation of challenges. This week it is a photo inspiration.
I was totally inspired by the colours and since I just received the new Altenew Spring Daisy bundle - I tried it out - yesssss!!
I used a combination of stamping and copics on this card - I shaded a bit more of the daisies that I should have probably - but I still like the outcome. Altenew's stamps are pretty much fool-proof so I was IN!
I used a thin panel of Lawn Fawn plaid patterned paper down the side - it was a perfect match - and then stamped the sentiment from Altenew's Floral Shadow set.
Thanks for coming around to visit - you still have a ton of time to enter The Challenge!
Showing posts with label dies. Show all posts
20 Sept 2016
28 Apr 2016
CAS-ual Fridays New Release Day Four!
Good Morning and welcome to another day of NEW Release sneak peeks for CAS-ual Fridays stamps!
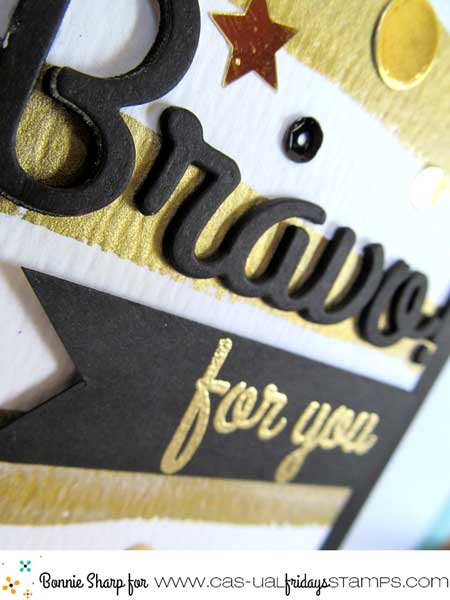
Today we are showing off "Bravo" and more Fri-dies and holy wow - I have two cards for you today!
I decided to get with "it" and make one a shaker card - I don't do them too often because I just keep thinking I am doing it wrong lol - but it really was quite easy to create.
- Don't forget there is a big sale happening right now in the store - and if you use my discount code "Bonnie2016" (no quotations) you receive another 15% off - crazy good!!
Today we are showing off "Bravo" and more Fri-dies and holy wow - I have two cards for you today!
I decided to get with "it" and make one a shaker card - I don't do them too often because I just keep thinking I am doing it wrong lol - but it really was quite easy to create.
I began by die cutting the Bravo Fri-die three times on black cardstock, and adhering acetate with a thin glue line to the back.
My card base is gold cardstock and after adding strips of foam tape around the outside, (making sure to keep it all closed up so that none of the sequins would fall out when I put it all together)-- I stuffed this baby full of gold, silver and copper sequins!!
I removed the protective strips from the foam tape and carefully laid the die cut cardstock on top to adhere.
The gold ribbon and sweet star sequins tied it all together - great for graduation or any other accomplishment for that matter!
For my next card I hand painted gold stripes onto watercolour paper and added the die-cut Bravo - I die cut the word three times and adhered them together to add some fabulous dimension.
I snipped some black cardstock into a flag shape and stamped the sentiment in versa mark ink. After embossing with gold embossing powder, I popped it up under the die cut.
I added a few more gold sequins - can you ever have enough?! I think not.
Take a look over at the CAS-ual Fridays blog to see who else is creating today - there are so many fabulous samples - it's unbelievable!
Labels:
Bravo,
Cas-ual Fridays,
dies
27 Feb 2016
It's Springtime at The Card Concept!
Holy man - spring can't come soon enough! I realize that I am in Florida - I haven't strayed that far - but it will soon be time to head home and I can hardly wait.
In the meantime I am stamping in Spring colours with this week's The Card Concept challenge - Floral Radiance.
I received my new Papertrey Ink package day before yesterday and so I have been playing and having fun!
The Tulip Time Stamp Set with beautiful multi-step images, is just a gorgeous set. I experimented and inked with a few different combos for my tulips - because they come in every colour anymore!
I loved the colour challenge colours…..
These images are so crisp and clear - I love them - I also did some sponging on the background with the new stencils from Papertrey Ink - this month's collection is called Modern Backgrounds.
I added a little bit of twine to tie up the tulips and stamped the sentiment in Mint Julep ink.
Have a wonderful day! and Happy Spring - it will get here, don't worry…….
In the meantime I am stamping in Spring colours with this week's The Card Concept challenge - Floral Radiance.
I received my new Papertrey Ink package day before yesterday and so I have been playing and having fun!
The Tulip Time Stamp Set with beautiful multi-step images, is just a gorgeous set. I experimented and inked with a few different combos for my tulips - because they come in every colour anymore!
I loved the colour challenge colours…..
These images are so crisp and clear - I love them - I also did some sponging on the background with the new stencils from Papertrey Ink - this month's collection is called Modern Backgrounds.
I added a little bit of twine to tie up the tulips and stamped the sentiment in Mint Julep ink.
Have a wonderful day! and Happy Spring - it will get here, don't worry…….
Labels:
dies,
Papertrey Ink,
The Card Concept
25 Feb 2016
Papertrey Ink Blog Hop!

Hey Hey!! It's time again for the Papertrey Ink Blog Hop - woohoo!! Just look at this gorgeous inspiration piece…..apples, ferns, butterflies, pinks, greens, maybe kraft….tons to choose from!
I chose to be inspired by the colours - Lovely Lady, Mint Julep and Classic Kraft….and I used Fresh Floral Wrap Up stamp set and dies, the Rustic Wreath Die
I die cut the wreath in Mint Julep and White linen cardstock and inlaid the white inside into the Mint Julep wreath.
The card base is Classic Kraft with white linen cardstock adhered and a line of black and white wash to divide them.
I stamped and die cut the wrap and flowers and glued the bottom with tombow mono glue and then popped up the top to give some depth.
I hope you enjoyed my creation today - and keep on a hopping'!!
Labels:
dies,
Papertrey Ink
18 Feb 2016
Faith Can Move Mountains
Oh my goodness - February and March are the busiest months in the park - we are gearing up for the annual Golf Tournament, and I am in the middle of my match play series. We are having a blast. Ron's brother and his wife are coming for a few days as well, so we are really looking forward to showing them around!
This week's challenge - on The Challenge - has a great colour theme...still Valentine-y and I'm not quite ready to let that go!
…and...I am absolutely in love with Reverse Confetti's newest release, so I am getting inky with it….
The Lord's Strength is a beautiful faith based set that is perfect for Bible journalling or card making. I have yet to enter the journalling phase - but I love the "feel" and hope to become familiar with it some time in my future.
I stamped and die cut the beautiful three step flowers from Garden Bunch - I only used two steps - purely your choice. My inks were Hibiscus Burst and Pure Poppy - both from Papertrey Ink.
I designed my card around the "faith" sentiment, using the flowers as a border and adding a few die cut Layered Laurels Confetti Cuts.
I stamped the sentiment onto a die cut from Love Note, and then cut a second one in red and offset the sentiment onto the red to form a slight border.
The cute little scalloped frame is Mama Elephant's Madison Avenue Framed Tags, cut from Papertrey Ink Gold Luxe Foil Patterned Paper.
I finished my creation with some black and white twine and little black baubles….
Thank you for visiting and have a great day!
This week's challenge - on The Challenge - has a great colour theme...still Valentine-y and I'm not quite ready to let that go!
…and...I am absolutely in love with Reverse Confetti's newest release, so I am getting inky with it….
The Lord's Strength is a beautiful faith based set that is perfect for Bible journalling or card making. I have yet to enter the journalling phase - but I love the "feel" and hope to become familiar with it some time in my future.
I stamped and die cut the beautiful three step flowers from Garden Bunch - I only used two steps - purely your choice. My inks were Hibiscus Burst and Pure Poppy - both from Papertrey Ink.
I designed my card around the "faith" sentiment, using the flowers as a border and adding a few die cut Layered Laurels Confetti Cuts.
I stamped the sentiment onto a die cut from Love Note, and then cut a second one in red and offset the sentiment onto the red to form a slight border.
The cute little scalloped frame is Mama Elephant's Madison Avenue Framed Tags, cut from Papertrey Ink Gold Luxe Foil Patterned Paper.
I finished my creation with some black and white twine and little black baubles….
Thank you for visiting and have a great day!
Labels:
card,
Confetti Cuts,
dies,
Faith based,
Reverse Confetti,
stamping,
The Challenge
13 Feb 2016
Howdy!
Papertrey Ink's 9th Anniversary Celebration is ongoing and another challenge is up on the block.
This time it is a Color Pop challenge - and we had a Color Pop sheet to download, print and play with! - My colours were Spring Rain, Blueberry Sky, Hawaiian Shores and Raspberry Fizz.
I was fine with the blues, but I must admit that the Raspberry Fizz rattled me haha. Perserverance is my middle name however, (not really) and I managed to create a cute little card - kind of CAS but had my brain working for sure.
Petite Places has so many series and one of them is the Barnyard Mini Set. I die cut and stamped the barn three times and added it to my card base.
I die cut the teeny fence and windmill - too cute! and tucked them in here and there.
The tractor had to be pink - I'm a farm girl - not born and raised but definitely in my blood since I married a farm boy - he's a cutie! It's the only way I will ever have a pink tractor so I am pouring it on!
The "roadway" is from "A Walk in the Park" stamped in Soft Stone….
Try out the challenges - there are lots and you can win prizes yay!!
This time it is a Color Pop challenge - and we had a Color Pop sheet to download, print and play with! - My colours were Spring Rain, Blueberry Sky, Hawaiian Shores and Raspberry Fizz.
I was fine with the blues, but I must admit that the Raspberry Fizz rattled me haha. Perserverance is my middle name however, (not really) and I managed to create a cute little card - kind of CAS but had my brain working for sure.
Petite Places has so many series and one of them is the Barnyard Mini Set. I die cut and stamped the barn three times and added it to my card base.
I die cut the teeny fence and windmill - too cute! and tucked them in here and there.
The tractor had to be pink - I'm a farm girl - not born and raised but definitely in my blood since I married a farm boy - he's a cutie! It's the only way I will ever have a pink tractor so I am pouring it on!
The "roadway" is from "A Walk in the Park" stamped in Soft Stone….
Try out the challenges - there are lots and you can win prizes yay!!
Labels:
card,
CAS,
dies,
Papertrey Ink,
Petite Places
9 Feb 2016
Happy for you….
Good morning and welcome to my fall creation - hah!
I've been water colouring again and I just bought the Papertrey Ink Sunflower Cover Plate - of course I am late to the table once again….
It has been just like autumn down here in Florida - just damp and chilly - I suppose it is all relative but for a warm state - it has yet to live up to it's reputation this winter……I know - whinewhinewhinewhine…
Let's get on to the card shall we :)
I began by using the thinnest pad in the embossing pad kit and just impressing the image onto my watercolour cardstock. Then I had a base to colour.
Using my Zig Real Brush Markers I painted away until I was happy with my image.
I then die cut the sunflower all the way through and painted it with my markers. I carefully adhered it to my water coloured image - I loved how the colours just pop!
Using the die and sentiments from One Big Happy - a fabulous free set offered over the holidays - I finished it - along with adding some sparkly sequins from Pretty Pink Posh!
I love watercolouring and Papertrey Ink is coming out with NEW watercolour sheets to colour - yay!!!
I've been water colouring again and I just bought the Papertrey Ink Sunflower Cover Plate - of course I am late to the table once again….
It has been just like autumn down here in Florida - just damp and chilly - I suppose it is all relative but for a warm state - it has yet to live up to it's reputation this winter……I know - whinewhinewhinewhine…
Let's get on to the card shall we :)
I began by using the thinnest pad in the embossing pad kit and just impressing the image onto my watercolour cardstock. Then I had a base to colour.
Using my Zig Real Brush Markers I painted away until I was happy with my image.
I then die cut the sunflower all the way through and painted it with my markers. I carefully adhered it to my water coloured image - I loved how the colours just pop!
Using the die and sentiments from One Big Happy - a fabulous free set offered over the holidays - I finished it - along with adding some sparkly sequins from Pretty Pink Posh!
I love watercolouring and Papertrey Ink is coming out with NEW watercolour sheets to colour - yay!!!
Labels:
cards,
Cover Plate,
dies,
Papertrey Ink,
watercolor,
watercoloring,
watercolouring
8 Dec 2015
God is Good!
I had a few minutes - and some fun stamps - to do some creating yesterday….in between golfing in the sun and gardening!
I followed Reverse Confetti's December SFYTT for this card….stamping with one of the sentiments from RC's God is Good…..I love this set and so I made sure to bring it with me to Florida so I could finally get it inky!
I stamped the sentiment with Papertrey Ink Ocean Tides
I stamped the sentiment with Papertrey Ink Ocean Tides and used Your Next Stamps Stitched Rectangle Die set for my rectangle front panel. I had a few odds and ends of patterned paper and a sweet water coloured panel to use for my card - yay! I finished it off with some fun twine and sequins.
I hope to get some stamping done in the next few days - I haven't even started my Christmas cards - eek!
I followed Reverse Confetti's December SFYTT for this card….stamping with one of the sentiments from RC's God is Good…..I love this set and so I made sure to bring it with me to Florida so I could finally get it inky!
I stamped the sentiment with Papertrey Ink Ocean Tides
I stamped the sentiment with Papertrey Ink Ocean Tides and used Your Next Stamps Stitched Rectangle Die set for my rectangle front panel. I had a few odds and ends of patterned paper and a sweet water coloured panel to use for my card - yay! I finished it off with some fun twine and sequins.
I hope to get some stamping done in the next few days - I haven't even started my Christmas cards - eek!
Labels:
cards,
dies,
Reverse Confetti,
Your Next Stamp
6 Aug 2015
DTGD Sweet Little One!
Hey there! I was totally inspired by this post of Jennifer McGuire's on "Copic Dot Coloring" so I had to give it a go - and I used her sketch - which, naturally, is brilliant!
Along with that, I am continuing with the Dare to Get Dirty Challenges for 2015 and this is for Sweet Miss Daisy's challenge.
I began by picking my image - this sweet little bunny from Your Next Stamp's set called Woodland Cuties - I use this set quite often for baby cards - so cute!
I lightly coloured him with C1 and then (held my breath) using C3 and C5, I made little dots where I thought there would be some darkening or shadows. I added a touch of C7 - which close up looks kind of weird, but the overall effect is eye-catching!
Finally I "coloured" a few dots for some grass and sky to finished it off.
My circles were die cut using the MFT Stitched Circle dies - I love them!
I popped it all up onto my card base that is covered with a piece of Papertrey Ink Sweet Blush patterned paper - just perfect!
Thanks for visiting - try some of those Splitcoaststamper Challenges - tons of PRIZES to be won!
Along with that, I am continuing with the Dare to Get Dirty Challenges for 2015 and this is for Sweet Miss Daisy's challenge.
I began by picking my image - this sweet little bunny from Your Next Stamp's set called Woodland Cuties - I use this set quite often for baby cards - so cute!
I lightly coloured him with C1 and then (held my breath) using C3 and C5, I made little dots where I thought there would be some darkening or shadows. I added a touch of C7 - which close up looks kind of weird, but the overall effect is eye-catching!
Finally I "coloured" a few dots for some grass and sky to finished it off.
My circles were die cut using the MFT Stitched Circle dies - I love them!
I popped it all up onto my card base that is covered with a piece of Papertrey Ink Sweet Blush patterned paper - just perfect!
Thanks for visiting - try some of those Splitcoaststamper Challenges - tons of PRIZES to be won!
Labels:
baby,
baby cards,
cards,
dies,
DTGD15,
Your Next Stamp
5 Aug 2015
Color Throwdown and DTGD Combo!
Good day and hello!
Another day and another Dare to Get Dirty Challenge - of course I can't tell you any of the details - but if you are a fan club member, you can find those challenges in the Dare to Get Dirty Forum on Splitcoaststampers - but it is a fun one for sure!
I CAN tell you that I have combined it with The Color Throwdown colours this week - gorgeous naturally!
I used Reverse Confetti stamps and Confetti Cuts - Love Blooms to be precise…..along with the "hello" Confetti Cuts !
I die cut and stamped some of the pretty flowers in Melon Berry ink and added some glitter to the flower centres. The leaves are stamped in New Leaf - a gorgeous green! I popped everything up onto a die cut piece of Papertrey Ink Damask Designs patterned paper .
I doubled up on the "hello" sentiment and tucked it in behind a few of the flowers.
Finally, I added a few little Your Next Stamp gumdrops - perfect!
Another day and another Dare to Get Dirty Challenge - of course I can't tell you any of the details - but if you are a fan club member, you can find those challenges in the Dare to Get Dirty Forum on Splitcoaststampers - but it is a fun one for sure!
I CAN tell you that I have combined it with The Color Throwdown colours this week - gorgeous naturally!
I used Reverse Confetti stamps and Confetti Cuts - Love Blooms to be precise…..along with the "hello" Confetti Cuts !
I die cut and stamped some of the pretty flowers in Melon Berry ink and added some glitter to the flower centres. The leaves are stamped in New Leaf - a gorgeous green! I popped everything up onto a die cut piece of Papertrey Ink Damask Designs patterned paper .
I doubled up on the "hello" sentiment and tucked it in behind a few of the flowers.
Finally, I added a few little Your Next Stamp gumdrops - perfect!
Labels:
cards,
Color Throwdown,
Confetti Cuts,
dies,
DTGD15,
Reverse Confetti
24 Jul 2015
Masculine Thank You
I realize the title of my post might be redundant……not many men send thank you cards but sometimes they might receive one - for something or other…..anyway the hole that I am digging brings me to my creation for today Hah!
I am linking up to this month's Reverse Confetti Sketch For You To Try (SFYTT) and this week's Color Throwdown - both fabulous is their own right-- naturally!
I used a ton 'o Reverse Confetti product for these beautiful colours - it was really a no-brainer!
I trimmed and layered up two of the fun Quick Card Panels -Weather or Dot (And Stripes) along with Pina Colada and stamped a couple of the sequins from Roundabout.
I stamped the thank you sentiment from Roundabout and die cut with the Circles 'n Scallops Confetti Cuts. This particular circle die leaves a bit more of a white border but I am A-ok with that!
I stapled a couple of little flags cut from Stitched Flag Trio Confetti Cuts - one of my favouritist of all time!! The little button tied with green twine added a little something - masculine for sure and not too frilly!
I am linking up to this month's Reverse Confetti Sketch For You To Try (SFYTT) and this week's Color Throwdown - both fabulous is their own right-- naturally!
I used a ton 'o Reverse Confetti product for these beautiful colours - it was really a no-brainer!
I trimmed and layered up two of the fun Quick Card Panels -Weather or Dot (And Stripes) along with Pina Colada and stamped a couple of the sequins from Roundabout.
I stamped the thank you sentiment from Roundabout and die cut with the Circles 'n Scallops Confetti Cuts. This particular circle die leaves a bit more of a white border but I am A-ok with that!
I stapled a couple of little flags cut from Stitched Flag Trio Confetti Cuts - one of my favouritist of all time!! The little button tied with green twine added a little something - masculine for sure and not too frilly!
Labels:
cards,
Color Throwdown,
dies,
Masculine,
Reverse Confetti,
thank you
22 Jul 2015
So very bee-you-tiful!
Good Sunny Morning in Ontario! This week's Sweet Sunday Sketch was beckoning me to play - and since I really wanted to use my Reverse Confetti stamp set called The Buzz I went to work (play)
I love the big sentiment and the cute little bees, so this set was perfect for this sketch!
I decided to keep all of that white space - (although it drives me crazy!) so that I could highlight the bees and sentiment.
I stamped and coloured the cute little bee with my copic markers and then die cut him with The Buzz Confetti Cuts. I diecut the sun from the Sun 'n Clouds Confetti Cuts and also used two of the flags from the Stitched Flag Trio Confetti Cuts - I LOVE these dies!
I tucked the little flags in where they should go and then decided that twine and baubles would be just perfect to finish my sketch Give that sketch a try - it's a cute one!!!
I love the big sentiment and the cute little bees, so this set was perfect for this sketch!
I decided to keep all of that white space - (although it drives me crazy!) so that I could highlight the bees and sentiment.
I stamped and coloured the cute little bee with my copic markers and then die cut him with The Buzz Confetti Cuts. I diecut the sun from the Sun 'n Clouds Confetti Cuts and also used two of the flags from the Stitched Flag Trio Confetti Cuts - I LOVE these dies!
I tucked the little flags in where they should go and then decided that twine and baubles would be just perfect to finish my sketch Give that sketch a try - it's a cute one!!!
Labels:
dies,
Reverse Confetti,
Sweet Sunday Sketch,
Twinery
13 Jul 2015
Just Because
Today I have combined *smooshing (a Laura Bassen favorite of mine) - and the Peony Cover Plate from Papertrey Ink for this week's Color Throwdown.
I used Shabby Shutters distressed ink along with Papertrey Ink Melon Berry and Hibiscus Burst re-inkers and combined them onto my non-stick craft sheet and spritzed the whole schmozzle with water.
I used plain white card stock - basically because my water-colour paper is somewhere beneath the hordes of paper on my desk - to lay on top of the watercolours and it worked terrifically!
I paid specific attention to the placement of the colours so that I could use the Peony Cover Plate on top - which I did- hah!
I added the sentiment - from the Papertrey Ink Scripted stamp set - onto white card stock and popped it up. Some beautiful gems finished it off!
Woohoo! - now to link up to The Color Throwdown!
I used Shabby Shutters distressed ink along with Papertrey Ink Melon Berry and Hibiscus Burst re-inkers and combined them onto my non-stick craft sheet and spritzed the whole schmozzle with water.
I used plain white card stock - basically because my water-colour paper is somewhere beneath the hordes of paper on my desk - to lay on top of the watercolours and it worked terrifically!
I paid specific attention to the placement of the colours so that I could use the Peony Cover Plate on top - which I did- hah!
I added the sentiment - from the Papertrey Ink Scripted stamp set - onto white card stock and popped it up. Some beautiful gems finished it off!
Woohoo! - now to link up to The Color Throwdown!
Labels:
Color Throwdown,
dies,
Papertrey Ink
14 Jun 2015
Thanks….Southwestern Style
Hello hello! Just popping in with another pretty colour combo from The Color Throwdown!
This week's colours are pink, green, kraft and gray- a little different but I always think to myself - if there is green involved - then I can stamp flowers!
I began by stamping an arrangement of borders from the Southwestern Style stamp set from Papertrey Ink onto Vintage Cream card stock in Classic Kraft ink on an angle for a bit of interest.
I die cut a Kraft card stock panel using the Stitched Rectangle Dies - (I was inspired by Amy Scheffer's use of these dies!)- and layered my stamped panel on top -so perfect!
I adhered those two panels to another Vintage Cream die cut panel and then popped up the whole thing onto a Vintage Cream card base.
Using the newest Make It Market Kit - Nostalgic Notions - I die cut and stamped the flowers and leaves and then popped them up onto my border stamped layer. The inks I used were Raspberry Fizz, Hibiscus Burst and Lavender Moon for the flowers and Simply Chartreuse for the leaves.
I finished my creation by stamped the sentiment in Smokey Shadow ink and adding a little puffy heart :)
Why don't you join in? You have until 6:00 pm on Monday!
This week's colours are pink, green, kraft and gray- a little different but I always think to myself - if there is green involved - then I can stamp flowers!
I began by stamping an arrangement of borders from the Southwestern Style stamp set from Papertrey Ink onto Vintage Cream card stock in Classic Kraft ink on an angle for a bit of interest.
I die cut a Kraft card stock panel using the Stitched Rectangle Dies - (I was inspired by Amy Scheffer's use of these dies!)- and layered my stamped panel on top -so perfect!
I adhered those two panels to another Vintage Cream die cut panel and then popped up the whole thing onto a Vintage Cream card base.
Using the newest Make It Market Kit - Nostalgic Notions - I die cut and stamped the flowers and leaves and then popped them up onto my border stamped layer. The inks I used were Raspberry Fizz, Hibiscus Burst and Lavender Moon for the flowers and Simply Chartreuse for the leaves.
I finished my creation by stamped the sentiment in Smokey Shadow ink and adding a little puffy heart :)
Why don't you join in? You have until 6:00 pm on Monday!
8 Jun 2015
The Color Throwdown #345
Good morning - just popping in with this week's Color Throwdown - another week of strikingly beautiful colours woohoo!
My Reverse Confetti Party Hats stamp set came to mind so I lovingly inked them up! and that MISTI!!! ackkkk!! It was just the thing to use to get those cute little party hats so beautifully Pure Poppy RED…... I just inked and stamped over and over - gorgeously easy!
I was a little worried that they looked like Santa hats lol, so after I ran the hat trim through my Cuttlebug Swiss Dots folder, I used my marker and tapped each little dot with black. - Perfect solution.
The Wonky Double Edged Confetti Cuts border and the Circle Garland Confetti Cuts each leant a perfect design to my party creation - and I could NOT help it - I had to add a bit of gold thread and ribbon- not part of the colour palette - but it sort of worked itself out in the end!
You have until 6:00 pm tonight to enter this delicious Color Throwdown challenge - give it a go!
My Reverse Confetti Party Hats stamp set came to mind so I lovingly inked them up! and that MISTI!!! ackkkk!! It was just the thing to use to get those cute little party hats so beautifully Pure Poppy RED…... I just inked and stamped over and over - gorgeously easy!
I was a little worried that they looked like Santa hats lol, so after I ran the hat trim through my Cuttlebug Swiss Dots folder, I used my marker and tapped each little dot with black. - Perfect solution.
The Wonky Double Edged Confetti Cuts border and the Circle Garland Confetti Cuts each leant a perfect design to my party creation - and I could NOT help it - I had to add a bit of gold thread and ribbon- not part of the colour palette - but it sort of worked itself out in the end!
You have until 6:00 pm tonight to enter this delicious Color Throwdown challenge - give it a go!
1 Jun 2015
Oh hello Color Throwdown!
Just popping in with my card for this week's Color Throwdown! It is almost deadline time - definitely not too punctual at these things.
I'm still diggin' those pineapples from Reverse Confetti and the tropical feel of this week's challenge was another perfect chance to stamp up Pineapples Aplenty!
This sketch also gave me the opportunity to use Reverse Confetti's Confetti Cut - "hello"!
I used this week's sketch from Freshly Made Sketches….but I was TOO LATE to link it up ...argggghhh!!!
Thanks for coming around to view my creation today - love having you visit!
I'm still diggin' those pineapples from Reverse Confetti and the tropical feel of this week's challenge was another perfect chance to stamp up Pineapples Aplenty!
This sketch also gave me the opportunity to use Reverse Confetti's Confetti Cut - "hello"!
I used this week's sketch from Freshly Made Sketches….but I was TOO LATE to link it up ...argggghhh!!!
Thanks for coming around to view my creation today - love having you visit!
20 May 2015
You had me at Aloha!
I finally blogged - well yay me.
There is something about sitting down for more than 5 minutes (yes, I know) and writing up a blog post that has me stymied. I can sit here for hours on Pinterest or Facebook or scouring through various stamp company sites - but BLOG? Honestly blechhh...…..
However…..I really do like to do The Color Throwdown and this week - the colours were so pretty I couldn't not resist…so it is only fair to show you all my pretty production!…...and since I needed a starting point, I combined it with this month's Sketch For You To Try from Reverse Confetti!
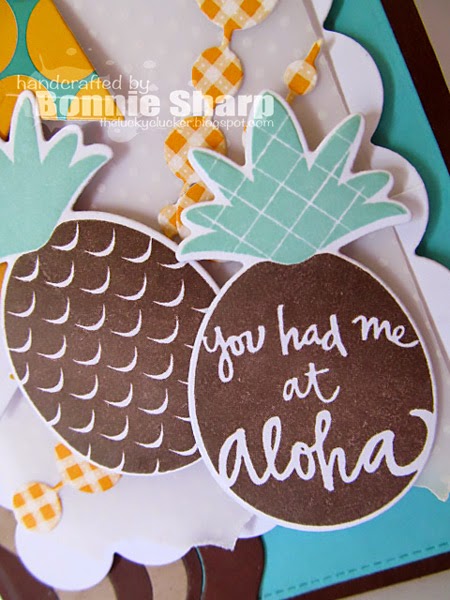
I brought out my Pineapples Aplenty stamp set and Confetti Cuts from Reverse Confetti and stamped away - using the unusual colour combo for my pineapples.
I stamped two of the pineapples with Dark Chocolate ink - and my MISTI (eeks!)…then I die cut them - look how even those pineapples are!! The Confetti Cuts make it too easy - I even impress myself haha
The little flags at the top are die cut using the Stitched Flag Trio Confetti Cuts…I used a piece of the Quick Card Panels sheets for one of the flags and I just happened to have a piece yellow watercolored paper to use for the other flag.
I also used the Circle Garland Confetti Cuts for a bit more colour behind the pineapples……The little waves are from Doin' The Wave Confetti Cuts and I cut them with Dark Chocolate and Kraft card stock.
There is also a little square of pin dotted vellum behind the pineapples which - in real life- looks quite fine!
Thanks for visiting today and listening to my blog whining :)
There is something about sitting down for more than 5 minutes (yes, I know) and writing up a blog post that has me stymied. I can sit here for hours on Pinterest or Facebook or scouring through various stamp company sites - but BLOG? Honestly blechhh...…..
However…..I really do like to do The Color Throwdown and this week - the colours were so pretty I couldn't not resist…so it is only fair to show you all my pretty production!…...and since I needed a starting point, I combined it with this month's Sketch For You To Try from Reverse Confetti!
I brought out my Pineapples Aplenty stamp set and Confetti Cuts from Reverse Confetti and stamped away - using the unusual colour combo for my pineapples.
I stamped two of the pineapples with Dark Chocolate ink - and my MISTI (eeks!)…then I die cut them - look how even those pineapples are!! The Confetti Cuts make it too easy - I even impress myself haha
The little flags at the top are die cut using the Stitched Flag Trio Confetti Cuts…I used a piece of the Quick Card Panels sheets for one of the flags and I just happened to have a piece yellow watercolored paper to use for the other flag.
I also used the Circle Garland Confetti Cuts for a bit more colour behind the pineapples……The little waves are from Doin' The Wave Confetti Cuts and I cut them with Dark Chocolate and Kraft card stock.
There is also a little square of pin dotted vellum behind the pineapples which - in real life- looks quite fine!
Thanks for visiting today and listening to my blog whining :)
Labels:
Color Throwdown,
Confetti Cuts,
dies,
Reverse Confetti,
SFYTT
Subscribe to:
Posts (Atom)